This is the multi-page printable view of this section. .
Get Started
- 1: Single-Node Installation
- 2: Docker Deployment
- 3: Web Interface
- 4: Getting Started with PostgreSQL
- 5: Customize Pigsty with Configuration
- 6: Run Playbooks with Ansible
- 7: Offline Installation
- 8: Slim Installation
- 9: Security Recommendations
Use this guide to install Pigsty on one Linux node. Start with Quick Start. A node with 1 CPU core and 2 GB of memory is sufficient.
You can use a Linux MiniPC, a cloud server, Windows WSL, or a virtual machine on your laptop. Pigsty supplies Vagrant templates for local virtual machines. It also supplies OpenTofu templates for cloud servers.
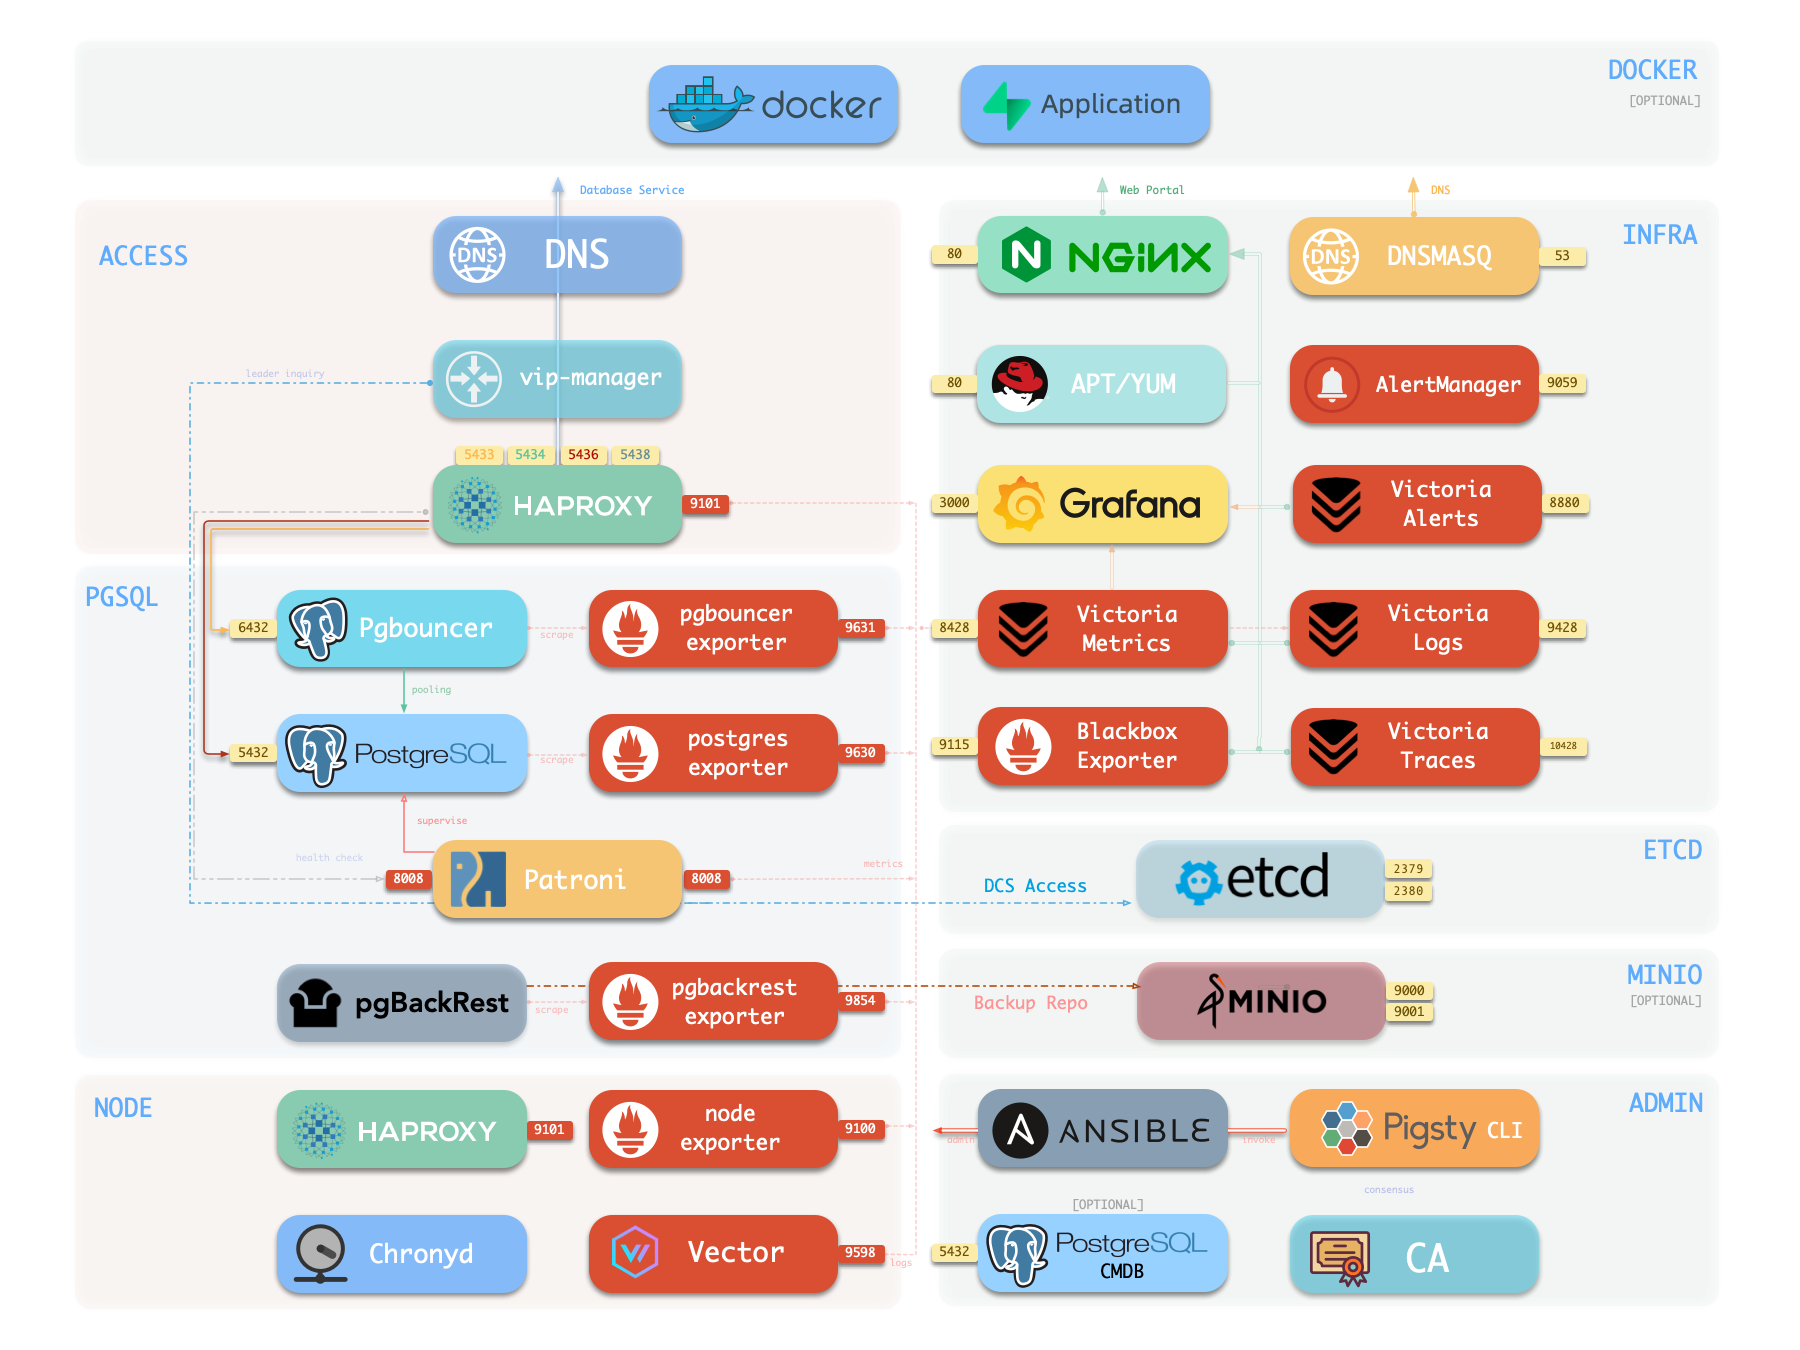
The single-node installation includes these features:
- 600 PostgreSQL extensions.
- Grafana and Victoria monitoring services.
- Infrastructure as code for deployment.
- Local point-in-time recovery (PITR).
External object storage can keep PostgreSQL backups outside the node. These backups improve data durability for demonstrations, personal websites, and small services. A single node cannot provide high availability. Automatic failover requires at least three nodes.
Choose the installation method that meets your requirements:
| Requirement | Guide |
|---|---|
| Install Pigsty on one Linux node | Quick Start |
| Try Pigsty on macOS or Windows | Docker Deployment |
| Install without Internet access | Offline Installation |
| Install PostgreSQL without monitoring services | Slim Installation |
| Deploy multiple nodes for production | Deployment Guide |
Quick Start
- Prepare a node with a supported Linux operating system.
- Use an administration account with passwordless SSH and sudo access.
- Run the commands below.
The installation script downloads Pigsty and installs its dependencies.
The configuration script creates pigsty.yml and generates random passwords.
The deployment playbook installs the modules in the configuration file.
You can also select a configuration template. The template supplies the initial configuration.
After deployment, do these tasks:
- Open the Web UI.
- Connect to PostgreSQL.
- Apply the security recommendations.
- Change the configuration to add more clusters.
- Run playbooks to apply the configuration.
1 - Single-Node Installation
This guide installs Pigsty on one Linux node. Single Node For production deployments with multiple nodes, use the Deployment Guide.
The procedure has three stages: Install, Configure, and Deploy.
Summary
Prepare a node with a supported operating system. Use an administration account with passwordless SSH and sudo access.
Select a download source and run its command:
The installation script downloads and extracts Pigsty into your home directory. It also installs the deployment dependencies.
Then do these steps:
Enter the Source Directory
Run this command:
Generate the Inventory
Run this command to generate the configuration file and random passwords:
If you already have a prepared pigsty.yml, skip this step.
Run the Deployment Playbook
Run this command:
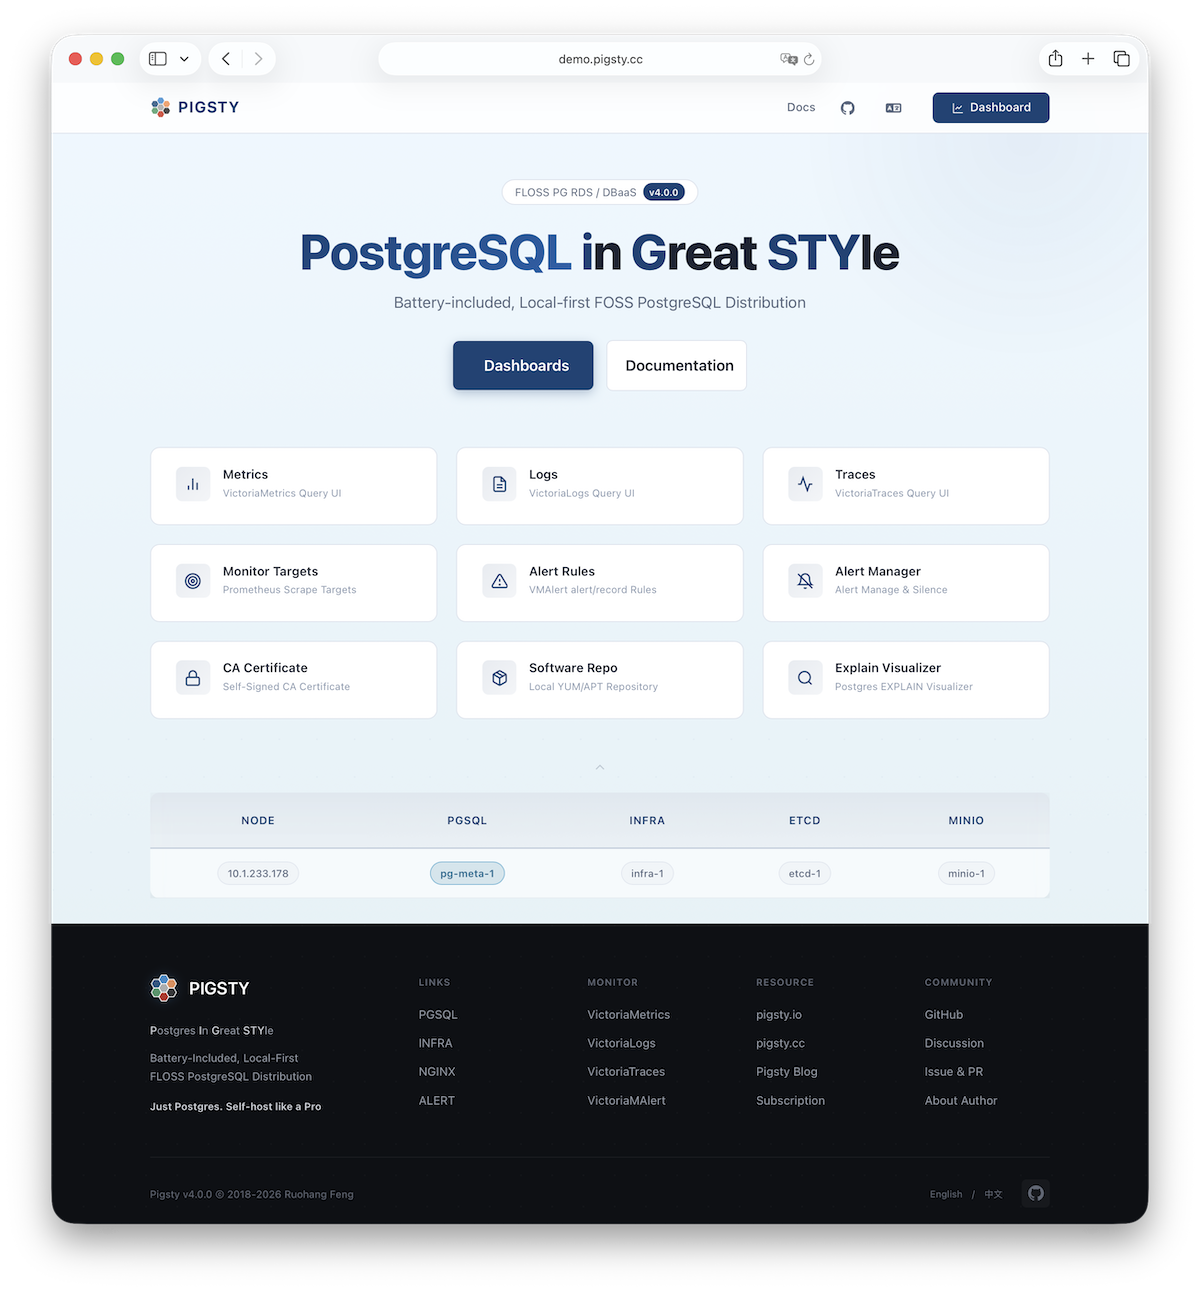
After deployment, open the Web UI through Nginx on port 80 or 443.
Use the node IP address or domain name.
Connect to the default PostgreSQL service on port 5432.
The procedure usually takes 3–10 minutes. The duration depends on the server resources and network speed. Offline installation can reduce the duration. If you do not need monitoring, use Slim Installation to install fewer components.
Example: online installation on Debian 13, x86_64
demo/install-hero.cast — /demo/install-hero.cast
Prepare
Review the preparation requirements.
For a single-node installation, first identify the node IP address.
If the node has no static IP address, you can use 127.0.0.1.
| Item | Requirement | Item | Requirement |
|---|---|---|---|
| Node | 1-node, at least 1C2G, no upper limit | Disk | /data mount point, xfs recommended |
| OS | Linux x86_64 / aarch64, EL/Debian/Ubuntu | Network | Static IPv4; single-node without fixed IP can use 127.0.0.1 |
| SSH | nopass SSH login via public key | SUDO | sudo privilege, preferably with nopass option |
The 127.0.0.1 exception applies to single-node installations.
Install
Use one of these commands to install Pigsty into ~/pigsty.
The script also installs Ansible and other deployment dependencies.
You can also download a release or clone the source repository. If you use Git, select a released version before deployment:
If you download or clone the source manually, run bootstrap to install the dependencies:
You can also install Ansible manually.
Configure
The inventory defines the deployment.
Pigsty uses pigsty.yml as the default inventory file.
Edit this file to change the deployment configuration.
The configure script is an optional configuration wizard.
It generates an inventory from your environment and input.
Run it with -g to generate random passwords:
The default output file is ~/pigsty/pigsty.yml.
Examine this file and make the necessary changes before deployment.
Use the configuration templates as examples.
You can also edit pigsty.yml directly without the wizard.
The output below is from v4.5.0. If you install a different version, the first line shows that version.
Common configure Arguments
-i | --ip,Set the primary private IPv4 address of the current node. The script replaces
10.10.10.10in the inventory with this address.-c | --conf,Select a configuration template relative to
conf/. Omit the.ymlsuffix.-v | --version,Select a PostgreSQL major version from
14through19. PostgreSQL 19 is Beta. Use the dedicatedpg19template for that version.-r | --region, ,Select the upstream repository region:
default,china, oreurope. Use the region that gives faster downloads.-n | --non-interactive, ,Supply the primary IP address through command-line arguments. Skip the interactive wizard.
-x | --proxy, ,Use the current environment variables to configure
proxy_env.
If the node has multiple IP addresses, specify the primary address with -i|--ip <ipaddr>.
You can also enter the address at the interactive prompt.
Use a static private IPv4 address.
Do not use a public IP address.
Default credentials are public.
Replace them in pigsty.yml before deployment.
See Security Recommendations for the credentials that configure -g does not replace.
Deploy
The deploy.yml playbook applies the inventory to the target nodes.
Run it from the Pigsty source directory:
At the end, look for pgsql init done and PLAY RECAP.
Make sure that the target nodes report failed=0 and unreachable=0.
Changes to Linux or PGDG repositories can break package dependencies. If installation fails for this reason, wait for the upstream correction. You can also use offline packages.
If Pigsty is already deployed, another run of deploy.yml can restart services.
It can also overwrite configuration files.
Examine the required changes before you run the playbook again.
Interface
A default single-node installation puts four modules on the current node: PGSQL, INFRA, NODE, and ETCD.
INFRA supplies the Web UI through Nginx on ports 80 and 443.
PGSQL supplies the PostgreSQL service on port 5432.
You can also connect through PgBouncer or HAProxy.
More
Use the current node to deploy and monitor additional clusters. First add their definitions to the inventory. Then run the applicable commands:
Install the NODE module first when the target module requires it. See the module reference for dependencies. Available modules include PGSQL, INFRA, ETCD, MINIO, REDIS, and DOCKER.
2 - Docker Deployment
Pigsty runs on native Linux. It can also run in Linux containers with systemd. If you use macOS or Windows, use Docker to try a local single-node installation.
Quick Start
Enter the docker/ source directory.
Run the launch command:
After deployment, use these addresses and commands to connect:
| Service | URL / Command | Credentials |
|---|---|---|
| SSH | ssh root@localhost -p 2222 | Password: pigsty |
| Web Portal | http://localhost:8080 | - |
| Grafana | http://localhost:8080/ui | admin / grafana_admin_password |
| PostgreSQL | psql 'postgres://dbuser_dba:<pg_admin_password>@localhost:5432/postgres' | pg_admin_password |
The make launch command runs ./configure -g to generate random passwords.
Use this command to find the generated passwords:
The Web Portal and PostgreSQL become available after ./deploy.yml completes successfully.
Prepare
Make sure that the host meets these requirements:
| Item | Requirement | Item | Requirement |
|---|---|---|---|
| Docker | Docker 20.10+ (Desktop or CE) | CPU | At least 1 core |
| RAM | At least 2GB | Disk | At least 20GB free |
Make sure that host ports 2222, 8080, 8443, and 5432 are available.
If a port is in use, change its mapping in .env before launch.
- Try Pigsty on macOS or Windows.
- Learn, test, develop, or debug Pigsty features.
- Run a local PostgreSQL development environment.
This single-node container does not provide high availability across multiple nodes. For production or large deployments, use native Linux virtual machines or physical servers. Native Linux avoids the container and virtualization overhead of this testing environment.
Image
Pigsty supplies the pgsty/pigsty image on Docker Hub.
| Image | Pull | Size | Contents |
|---|---|---|---|
pgsty/pigsty | ~500MB | 1.3GB | Debian 13 + systemd + SSH + pig + Ansible |
The image supports amd64 (x86_64) and arm64.
The ARM architecture includes Apple Silicon and AWS Graviton.
Image tags follow Pigsty versions.
The latest and v4.5.0 tags point to the current release.
Select a version tag for repeatable deployment.
The image uses Debian 13 (Trixie).
It includes systemd, SSH, the pig command-line tool, Ansible, and initialized Pigsty source.
The Docker configuration template prepares it for ./deploy.yml.
Launch
Use the commands in the docker/ directory.
The make launch command starts the container, generates its configuration, and runs deployment:
To examine each stage separately, run the commands in this order:
To build the image locally, use these commands:
Config
Set the image version and port mappings in .env:
The port variables map host ports to container ports:
| Env Var | Default | Container | Description |
|---|---|---|---|
PIGSTY_VERSION | v4.5.0 | - | Current main source default; verify the remote tag separately |
PIGSTY_SSH_PORT | 2222 | 22 | SSH access port |
PIGSTY_HTTP_PORT | 8080 | 80 | Nginx HTTP port |
PIGSTY_HTTPS_PORT | 8443 | 443 | Nginx HTTPS port |
PIGSTY_PG_PORT | 5432 | 5432 | PostgreSQL port |
If a default host port is in use, supply a different value through an environment variable:
Commands
The Docker Makefile supplies commands to manage containers and images. Run these commands from the Docker source directory.
Docker Compose
Use Docker Compose for the standard deployment procedure:
Container Access
Use these commands to enter the container or open a service client:
Image Build
Use these commands to build images:
Image Management
Use these commands to manage images:
Cleanup
Use these commands to remove the selected resources:
The make purge command removes the container and runs rm -rf -- ./data.
It has no countdown prompt.
Before you run it, confirm the current directory and the target data.
Back up any data that you need to keep.
Manual Run
To start the container with docker run, use this command:
You can also use the Makefile command:
How It Works
The image uses Debian 13 (Trixie) with systemd as the initialization system.
Manage services inside the container with systemctl, as on native Linux.
The container has these properties:
- Systemd manages the services.
- SSH permits root access with the password
pigsty. - The
--privilegedoption supplies the access required by systemd. - The
/datavolume keeps data outside the container. - The image includes pig, Ansible, and initialized Pigsty source.
The image build runs these initialization steps:
The ./configure -c docker command selects the Docker configuration template.
This template uses 127.0.0.1 as the default IP address and applies settings for the container environment.
FAQ
Container won’t start
Make sure that Docker is installed and the host meets the resource requirements.
On Docker Desktop, allocate at least 2 GB of memory.
Examine ports 2222, 8080, 8443, and 5432 for conflicts.
Can’t access services
Make sure that ./deploy.yml completed successfully.
The Web Portal and PostgreSQL require this deployment stage.
Run make status to see the service status.
Port conflicts
Change the port in .env or supply an environment variable:
Data persistence
The host directory ./data stores persistent container data.
To remove this data and start again, use these commands:
The purge step deletes the existing data. Back up any required data first.
macOS performance
Docker Desktop on macOS uses a virtual machine. This adds overhead compared with native Linux. Use Docker for development and testing. For production, use native Linux installation.
More
- Docker Hub supplies the image.
- Source Directory contains the Docker configuration and Makefile.
- Native Linux Installation describes single-node deployment.
- Offline Installation describes installation without Internet access.
- Deployment Guide describes production deployment.
3 - Web Interface
The default single-node installation includes the INFRA module. This module installs an Nginx web server on the node. Nginx supplies the Web UI and proxies requests to the monitoring services and other component interfaces.
Access
Enter the deployment node IP address in your browser.
By default, Nginx uses port 80 for HTTP and port 443 for HTTPS.
Replace 10.10.10.10 in these examples with your node IP address.
| Direct IP Access | Domain (HTTP) | Domain (HTTPS) | Demo |
|---|---|---|---|
http://10.10.10.10 | http://i.pigsty | https://i.pigsty | https://demo.pigsty.io |
Monitoring
To open the Grafana dashboards, add /ui to the server address:
| Direct IP Access | Domain (HTTP) | Domain (HTTPS) | Demo |
|---|---|---|---|
http://10.10.10.10/ui | http://i.pigsty/ui | https://i.pigsty/ui | https://demo.pigsty.io/ui |
If the service is accessible from the Internet or an office network, use a domain name. Enable HTTPS to encrypt the connection.
Endpoints
Nginx uses these paths to proxy requests to the components. Open each path through the server HTTP or HTTPS address. The native port is the port of the component behind Nginx.
| Endpoint | Component | Native Port | Description | Public Demo |
|---|---|---|---|---|
/ | Nginx | 80/443 | Homepage, local repo, file service | demo.pigsty.io |
/ui/ | Grafana | 3000 | Grafana dashboard portal | demo.pigsty.io/ui/ |
/vmetrics/ | VictoriaMetrics | 8428 | Time series database Web UI | demo.pigsty.io/vmetrics/ |
/vlogs/ | VictoriaLogs | 9428 | Log database Web UI | demo.pigsty.io/vlogs/ |
/vtraces/ | VictoriaTraces | 10428 | Distributed tracing Web UI | demo.pigsty.io/vtraces/ |
/vmalert/ | VMAlert | 8880 | Alert rule management | demo.pigsty.io/vmalert/ |
/alertmgr/ | AlertManager | 9059 | Alert management Web UI | demo.pigsty.io/alertmgr/ |
/blackbox/ | Blackbox | 9115 | Blackbox exporter | |
/haproxy/* | HAProxy | 9101 | Load balancer admin Web UI | |
/pev | PEV2 | 80 | PostgreSQL execution plan visualizer | demo.pigsty.io/pev |
/nginx | Nginx | 80 | Nginx status page (for metrics) |
Domain Access
Point your domain name to the Pigsty server IP address.
Set the domain in the home server configuration.
This configuration is part of infra_portal:
To use a Let’s Encrypt certificate, also set certbot:
After deployment, run make cert to request the free Let’s Encrypt certificate.
If you omit certbot, Pigsty uses the local certificate authority (CA) to issue an HTTPS certificate.
Add the Pigsty CA to your browser trust store before you use that certificate.
You can also configure Nginx to serve local directories or proxy other upstream services. See Nginx Management for the procedure.
4 - Getting Started with PostgreSQL
PostgreSQL is an open-source relational database. It can store and retrieve different types of data. This guide uses PG as an abbreviation for PostgreSQL.
Use this guide if you know basic Linux commands and want to start with PostgreSQL in Pigsty. The examples use the default single-node installation. For production clusters with multiple nodes, see Service Access.
Basics
The default single-node template creates the pg-meta cluster on the current node.
This cluster has one primary instance.
PostgreSQL listens on port 5432.
The template also creates the meta database.
After installation, close your administration account SSH session.
Log in again to load the new environment variables.
Enter pp to open psql:
The command uses p as a shortcut for the pig command-line tool.
You can also use the postgres operating system account to run psql.
This connects to the default postgres administration database.
Connecting to Database
Use a command-line tool or a graphical client to connect. Supply a PostgreSQL connection string in this format:
Some drivers and clients require separate connection parameters:
| Parameter | Description | Example Value | Notes |
|---|---|---|---|
host | Database server address | 10.10.10.10 | Replace with your node IP or domain; can omit for localhost |
port | Port number | 5432 | PG default port, can be omitted |
username | Username | dbuser_dba | Pigsty default database admin |
password | Password | DBUser.DBA | Pigsty default admin password (change this!) |
dbname | Database name | meta | Default template database name |
For personal administration, you can use dbuser_dba.
This account is a database superuser with full privileges.
If you ran configure -g, the script generated a random administration password.
Find the password in ~/pigsty/pigsty.yml:
Default Accounts
The default single-node template defines these database accounts:
| Username | Password | Role | Purpose |
|---|---|---|---|
dbuser_dba | DBUser.DBA | Superuser | Database admin (change this!) |
dbuser_meta | DBUser.Meta | Business admin | App R/W (change this!) |
dbuser_view | DBUser.Viewer | Read-only user | Data viewing (change this!) |
These examples connect to the same meta database with different accounts:
Replace the example IP address and password with your actual values.
The configure -g command replaces the three example passwords with random passwords.
See Security Recommendations for its complete scope and limitations.
Using CLI Tools
psql is the PostgreSQL command-line client.
On a Pigsty node, use one of these methods to connect to the local database:
Replace the example IP address and password before you run the connection commands.
After a successful connection, psql shows a prompt:
Common psql commands
Enter SQL statements at the prompt.
To run a psql meta-command, start the command with \.
| Command | Description | Command | Description |
|---|---|---|---|
Ctrl+C | Interrupt query | Ctrl+D | Exit psql |
\? | Show all meta commands | \h | Show SQL command help |
\l | List all databases | \c dbname | Switch to database |
\d table | View table structure | \d+ table | View table details |
\du | List all users/roles | \dx | List installed extensions |
\dn | List all schemas | \dt | List all tables |
SQL example
End each SQL statement with a semicolon (;).
This example creates a test table, adds two rows, queries the rows, and removes the table:
Using Graphical Clients
You can also connect with a graphical client.
Grafana
The INFRA module includes Grafana and a PostgreSQL data source named Meta. Open the Web UI. Use the Grafana Explore panel to query PostgreSQL with SQL. This method requires no additional client software.
The default Grafana username is admin.
Find its password in grafana_admin_password in the inventory.
The default password is pigsty.
DataGrip
DataGrip is a database development tool from JetBrains. IntelliJ IDEA also has a Database Console that can connect to PostgreSQL.
DBeaver
DBeaver is a free, open-source database client. It runs on multiple desktop operating systems and supports PostgreSQL and other databases.
pgAdmin
pgAdmin is a PostgreSQL administration client from PGDG. You can use its browser interface or desktop application. Pigsty supplies a pgAdmin template for deployment with Docker.
Viewing Monitoring Dashboards
Pigsty supplies PostgreSQL monitoring dashboards. They show information from cluster summaries to individual tables.
Open PGSQL Overview first. Select a cluster to see its instances and databases. Use the dashboard links to examine tables, indexes, and functions.
Trying Extensions
PostgreSQL extensions add data types, functions, index methods, and other database features. Pigsty packages 600 extensions in 16 categories. These categories include time-series data, geographic data, vectors, and full-text search.
Start with these extensions:
postgisprocesses geographic and location data. The default template installs it.pgvectorsupplies vector similarity search for AI embeddings. The default template installs it.timescaledbstores and queries time-series data. Install it when required.
Use these commands to list and enable extensions:
Next Steps
Change the configuration to define your databases, users, and extensions.
5 - Customize Pigsty with Configuration
You can generate a configuration file with the configuration wizard. You can also write the file yourself. This guide builds an inventory in stages.
The deploy.yml playbook deploys NODE, INFRA, ETCD, MINIO, and PGSQL when the inventory defines them.
Docker, Redis, Kafka, native MySQL, JUICE, and VIBE require their own playbooks.
The procedures below show the configuration and playbooks for each stage.
Minimal Configuration
The smallest valid configuration defines admin_ip.
This is the IP address of the administration node where you installed Pigsty:
This inventory defines no deployment targets.
With this configuration, ./deploy.yml generates a self-signed certificate authority (CA) in files/pki/ca.
The CA issues certificates for the deployment.
Set region to select a software repository region.
The available values are default, china, and europe.
Add Nodes
The NODE module manages the nodes in the inventory. Add a node IP address to include that node in NODE module deployment:
These examples add two global parameters:
node_repo_modulesselects the software repositories to add.regionselects the repository region.
The NODE module uses these repositories to install the required packages. Other NODE parameters control node names, DNS, NTP, kernel parameters, tuning, monitoring, and log collection. You can use the default values for the initial deployment.
Run node.yml to apply the NODE configuration.
The deploy.yml playbook also includes this stage.
Add Infrastructure
The infrastructure supplies monitoring, alerting, dashboards, NTP, and DNS.
To deploy the INFRA module, define the infra group:
Set infra_seq to identify each INFRA node.
This identity parameter distinguishes nodes in deployments with multiple INFRA nodes.
Run infra.yml to install INFRA and NODE on 10.10.10.10:
demo/infra.cast — /demo/infra.cast
The inventory IP address also defines the NODE deployment target. NODE tasks are idempotent: they apply the changes necessary to reach the specified configuration.
After this stage, the node has monitoring services and node monitoring. It does not yet have a PostgreSQL database service.
If you only need Grafana and Victoria monitoring, you can stop here.
The infra template supports this use.
Pigsty also supports PostgreSQL without the infrastructure through Slim Installation.
Deploy Database Cluster
To add PostgreSQL, define the PGSQL module and its ETCD dependency:
The etcd group defines a single-node etcd cluster.
The pg-meta group defines a single-node PostgreSQL cluster.
Install ETCD first. PGSQL uses ETCD for high-availability consensus. Run the module playbooks in this order:
You can also apply the core modules together with ./deploy.yml.
Before another deployment run, review the effects on existing services.
After these playbooks complete successfully, PostgreSQL is available.
The procedures use four playbooks to deploy four modules on one node:
Define Databases and Users
Define PostgreSQL databases and users in the inventory:
pg_users defines the dbuser_meta account with the example password DBUser.Meta.
pg_databases defines the meta database with the vector extension.
It also loads the optional Pigsty CMDB schema.
Replace the example password before deployment.
Database and user parameters control their properties.
If you define these parameters before deployment, pgsql.yml creates the databases and users.
For an existing cluster, use these commands to create or change users and databases:
Configure PG Version and Extensions
Pigsty supports multiple PostgreSQL major versions and 600 extensions.
The example below replaces PostgreSQL 18 with PostgreSQL 16.
This procedure recreates pg-meta; it is not an in-place version change.
Before removal, back up the cluster and confirm the target. Use check mode to examine the removal tasks:
The --check command does not perform the removal.
Complete the required removal before you recreate the cluster.
Set these parameters in the new configuration:
pg_extensionsinstallstimescaledb,postgis, andpgvectorpackages.pg_libsloads thetimescaledb,pg_stat_statements, andauto_explainlibraries.pg_databasesenablesvector,postgis, andtimescaledbin themetadatabase.
Then run the PostgreSQL deployment playbook:
Add More Nodes
Add the new node definitions to the inventory.
Run bin/node-add to configure monitoring and repositories and install the node packages.
Select the complete group or individual IP addresses:
demo/node.cast — /demo/node.cast
Deploy HA PostgreSQL Cluster
Define the pg-test cluster on the three new nodes.
Set one node as the primary and two nodes as replicas:
Deploy the cluster with the PGSQL playbook or its bin/pgsql-add wrapper.
See the high-availability requirements for the ETCD topology.
demo/pgsql.cast — /demo/pgsql.cast
Deploy Redis Cluster
Pigsty supports Redis as an optional cache for PostgreSQL applications. After you define a Redis cluster in the inventory, run the applicable command:
For Redis high availability, use cluster mode or sentinel mode. See Redis Configuration.
Deploy Silo Object Storage
The MINIO module deploys Silo object storage.
Silo implements the S3 interface and can store PostgreSQL backups.
The module, inventory group, and playbooks keep the minio name for compatibility.
Run the module playbook:
A production Silo deployment typically requires at least four nodes with four disks per node (4N/16D).
Deploy Docker Module
To run PostgreSQL tools and applications in containers, install the DOCKER module:
Use an application template to deploy the required software. For example, run this command to deploy pgAdmin:
You can also deploy Supabase with Pigsty. Supabase uses an external HA PostgreSQL cluster for its database and containers for its stateless components.
6 - Run Playbooks with Ansible
Pigsty uses Ansible to deploy and manage clusters. Ansible applies declarative configuration through playbooks. Pigsty module playbooks use idempotent tasks to reach the specified configuration.
For a single-node installation, use deploy.yml.
Other built-in playbooks perform specific module operations.
Ansible knowledge helps you manage Pigsty, but the single-node procedure does not require it.
Deploy Playbook
The deploy.yml playbook applies the core deployment configuration.
It includes the CA, software repository, NODE, INFRA, ETCD, PGSQL, and MINIO when the inventory enables them.
Optional modules such as Redis, Kafka, and native MySQL require their own playbooks.
Defining these optional modules in the inventory does not add them to deploy.yml.
The table shows the module deployment targets:
| Playbook | Command | Group | infra | [nodes] | etcd | minio | [pgsql] |
|---|---|---|---|---|---|---|---|
infra.yml | ./infra.yml | -l infra | ✓ | ✓ | |||
node.yml | ./node.yml | ✓ | ✓ | ✓ | ✓ | ||
etcd.yml | ./etcd.yml | -l etcd | ✓ | ||||
minio.yml | ./minio.yml | -l minio | ✓ | ||||
pgsql.yml | ./pgsql.yml | ✓ |
You can apply the core configuration in one run with deploy.yml.
For deployment in stages, follow the Customization Guide.
Install Ansible
The Pigsty installation script installs Ansible and its dependencies. The offline bootstrap procedure can also install them.
To install Ansible manually, use the command for your operating system.
The minimum supported Ansible version is 2.9.
The EL 10 EPEL repository does not yet supply all required Ansible packages. The Pigsty PGSQL repository supplies the additional packages.
On macOS, install Ansible with Homebrew. You can use the Mac as an administration node for remote cloud servers. This method is suitable for personal single-node deployments. For production, use a Linux administration node.
Execute Playbook
Ansible playbooks are executable YAML files with task definitions.
Make sure that ansible-playbook is available through your PATH environment variable.
The command ./node.yml runs ansible-playbook node.yml.
Use these four arguments to control execution:
| Purpose | Parameter | Description |
|---|---|---|
| Target | -l|--limit <pattern> | Limit execution to specific groups/hosts/patterns |
| Tasks | -t|--tags <tags> | Only run tasks with specific tags |
| Params | -e|--extra-vars <vars> | Extra command-line parameters |
| Config | -i|--inventory <path> | Use a specific inventory file |
Limit Hosts
Use -l|--limit <selector> to select the target hosts or groups.
The selector can contain an IP address, group name, or pattern.
See the Ansible host and group patterns for the selection rules.
Most playbooks target all applicable inventory hosts if you omit --limit.
Specify the target before you run a playbook that changes an existing deployment.
Limit Tasks
Use -t|--tags <tags> to select tasks by tag.
This limits execution to the selected tasks instead of the complete playbook:
To select multiple tags, separate them with commas:
Extra Vars
Use -e|--extra-vars KEY=VALUE to override configuration parameters for one run.
These variables have the highest variable precedence.
You can supply -e more than once:
For lists, objects, or multiple variables, supply a JSON string:
Specify Inventory
The default inventory is pigsty.yml in the Pigsty source directory.
Use -i <path> to select a different inventory file:
To change the default permanently, edit inventory in ansible.cfg.
Convenience Scripts
The bin/ directory contains scripts for common operations.
Each script calls an Ansible playbook with the necessary arguments:
Use these scripts when their operation matches your task.
Playbook List
The table lists the built-in playbooks. You can add your own playbooks or change their tasks for your deployment requirements.
| Module | Playbook | Function |
|---|---|---|
| INFRA | deploy.yml | One-click deploy Pigsty on current node |
| INFRA | infra.yml | Initialize Pigsty infrastructure on infra nodes |
| INFRA | infra-rm.yml | Remove infrastructure components from infra nodes |
| INFRA | cache.yml | Create offline packages from target node |
| INFRA | cert.yml | Issue certificates using Pigsty self-signed CA |
| NODE | node.yml | Initialize node, adjust to desired state |
| NODE | node-rm.yml | Remove node from Pigsty |
| PGSQL | pgsql.yml | Initialize HA PostgreSQL cluster or add replica |
| PGSQL | pgsql-rm.yml | Remove PostgreSQL cluster or replica |
| PGSQL | pgsql-db.yml | Add new business database to existing cluster |
| PGSQL | pgsql-user.yml | Add new business user to existing cluster |
| PGSQL | pgsql-pitr.yml | Perform point-in-time recovery on cluster |
| PGSQL | pgsql-monitor.yml | Monitor remote PostgreSQL with local exporter |
| PGSQL | pgsql-migration.yml | Generate migration manual and scripts |
| PGSQL | slim.yml | Install Pigsty with minimal components |
| REDIS | redis.yml | Initialize Redis cluster/node/instance |
| REDIS | redis-rm.yml | Remove Redis cluster/node/instance |
| ETCD | etcd.yml | Initialize ETCD cluster or add new member |
| ETCD | etcd-rm.yml | Remove ETCD cluster/data or shrink member |
| MINIO | minio.yml | Initialize a Silo object-storage cluster |
| MINIO | minio-rm.yml | Remove Silo, its configuration, and optional data |
| DOCKER | docker.yml | Install Docker on nodes |
| DOCKER | app.yml | Install applications using Docker Compose |
| JUICE | juice.yml | Install and configure JuiceFS |
| VIBE | vibe.yml | Install the Vibe coding environment |
| KAFKA | kafka.yml | Create or converge a Kafka dynamic KRaft cluster |
| KAFKA | kafka-rm.yml | Remove a Kafka cluster or member |
| MYSQL (Pilot) | mysql.yml | Deploy native MySQL 8.4 standalone or three-node clusters |
| MYSQL (Pilot) | mysql-rm.yml | Stop and retire native MySQL while retaining local state |
7 - Offline Installation
Pigsty normally installs packages from upstream Internet repositories. If the environment has no Internet access, use offline packages.
Overview
An offline package contains the RPM or DEB packages and dependencies from a local APT or YUM repository. It records the repository contents after an online installation.
Use offline packages for production deployments when you need consistent package versions. They let new nodes use the same packages as the existing nodes. They also remove the installation dependency on upstream repository availability.
- Install in environments without Internet access.
- Download packages in advance to reduce installation time.
- Avoid installation failures from later upstream dependency changes.
- Download each package once for multiple nodes.
- Use one local repository to control package versions across nodes.
Offline packages target specific operating system minor versions.
A package can fail on a different version.
Its contents reflect the creation date and can omit later updates or security patches.
An offline package is approximately 1 GB.
Online installation downloads only the packages that you need.
Offline Packages
The v4.5.0 release supplies offline packages for seven recommended operating system versions.
Each version has an x86_64 package and an aarch64 package.
The fourteen artifacts are available from GitHub:
| Linux Distribution | System Code | Minor Version | Package |
|---|---|---|---|
| RockyLinux 9 x86_64 | el9.x86_64 | 9.8 | pigsty-pkg-v4.5.0.el9.x86_64.tgz |
| RockyLinux 9 aarch64 | el9.aarch64 | 9.8 | pigsty-pkg-v4.5.0.el9.aarch64.tgz |
| RockyLinux 10 x86_64 | el10.x86_64 | 10.2 | pigsty-pkg-v4.5.0.el10.x86_64.tgz |
| RockyLinux 10 aarch64 | el10.aarch64 | 10.2 | pigsty-pkg-v4.5.0.el10.aarch64.tgz |
| Debian 12 x86_64 | d12.x86_64 | 12.15 | pigsty-pkg-v4.5.0.d12.x86_64.tgz |
| Debian 12 aarch64 | d12.aarch64 | 12.15 | pigsty-pkg-v4.5.0.d12.aarch64.tgz |
| Debian 13 x86_64 | d13.x86_64 | 13.6 | pigsty-pkg-v4.5.0.d13.x86_64.tgz |
| Debian 13 aarch64 | d13.aarch64 | 13.6 | pigsty-pkg-v4.5.0.d13.aarch64.tgz |
| Ubuntu 26.04 x86_64 | u26.x86_64 | 26.04.0 | pigsty-pkg-v4.5.0.u26.x86_64.tgz |
| Ubuntu 26.04 aarch64 | u26.aarch64 | 26.04.0 | pigsty-pkg-v4.5.0.u26.aarch64.tgz |
| Ubuntu 24.04 x86_64 | u24.x86_64 | 24.04.4 | pigsty-pkg-v4.5.0.u24.x86_64.tgz |
| Ubuntu 24.04 aarch64 | u24.aarch64 | 24.04.4 | pigsty-pkg-v4.5.0.u24.aarch64.tgz |
| Ubuntu 22.04 x86_64 | u22.x86_64 | 22.04.5 | pigsty-pkg-v4.5.0.u22.x86_64.tgz |
| Ubuntu 22.04 aarch64 | u22.aarch64 | 22.04.5 | pigsty-pkg-v4.5.0.u22.aarch64.tgz |
The GitHub release page also supplies a checksums manifest.
Each artifact has a detached PGP signature with the .asc suffix.
The published MD5 checksums are:
The packages target EL 9.8 and 10.2, Debian 12.15 and 13.6, and Ubuntu 22.04.5, 24.04.4, and 26.04.0.
Different OpenSSL or system library versions can stop installation on another minor version.
Use the matching version, build your own offline package, or request a custom package.
Using Offline Packages
Do these steps in order:
- Download the matching offline package and save it as
/tmp/pkg.tgz. - Download and extract the Pigsty source package into your home directory.
- Run
cd ~/pigstyto enter the source directory. - Run
./bootstrapto extract the offline package, configure the local repository, and install Ansible. - Run
./configure -g -c richto select therichtemplate and generate random passwords. - Run
./deploy.ymlto install the core modules from the local repository.
You can also use your own configuration with the repository settings below. Other optional modules still require their own playbooks.
demo/install-offline.cast — /demo/install-offline.cast
The error No package nginx available usually follows an incomplete installation attempt.
The documented recovery removes /www/pigsty and runs deployment again.
Before removal, make sure that the directory contains only the repository that you intend to rebuild.
To use an extracted offline package with your own configuration, set these parameters:
- Set
repo_enabledtotrueto enable the local software repository. - Set
node_repo_modulestolocalto install all packages from that repository.
Most templates disable repository creation and select node,infra,pgsql as upstream package sources.
With node_repo_modules: local, the local repository is the only package source.
To permit upstream repositories as well, use local,node,infra,pgsql.
Hybrid installation
If the environment has Internet access, you can combine local and upstream package sources. Use the offline package as the initial repository. Then download missing packages from upstream.
For example, the v4.5.0 EL 9 package targets Rocky Linux 9.8.
If you use Rocky Linux 9.6, run make repo-build before deployment to download the packages required for 9.6.
This hybrid method requires Internet access to the upstream repositories.
Making Offline Packages
To build a package for another operating system, use the cache.yml playbook.
- Select an online node with the exact operating system version and architecture of the offline nodes.
- Run
./configure -c richand complete an online installation with therichtemplate. - Make sure that the target INFRA node has a local repository at
/www/pigsty. - If the repository is absent, run
./infra.yml -t repoagainst that node first. - From
~/pigsty, run./cache.yml -l <infra-host>to build and fetch the package from one INFRA node. - Copy the package to the offline environment with FTP, SCP, or a USB device.
- Use
bootstrapto extract the package.
The default artifact path is ~/pigsty/dist/${version}/pigsty-pkg-${version}.${os}.${arch}.tgz.
You can override these defaults with extra variables:
| Parameter | Default | Description |
|---|---|---|
cache_pkg_name | pigsty-pkg-${version}.${os}.${arch}.tgz | Offline package filename template |
cache_pkg_dir | dist/${version} | Output directory on the admin node |
cache_repo | pigsty | Local repository to package on the target node; separate multiple repositories with commas |
Paid services supply tested offline packages for specific operating system major and minor versions (¥200).
Bootstrap
Pigsty uses Ansible to run playbooks.
The bootstrap script installs Ansible and prepares the required package repositories:
Run bootstrap in these cases:
- You downloaded or cloned the source manually and Ansible is absent.
- You need to extract an offline package and install Ansible from it.
By default, the script looks for /tmp/pkg.tgz.
Use -p to specify a different package path.
If the package exists, the script extracts it and installs Ansible from the local repository.
If the package is absent, the script attempts an online Ansible installation.
If that installation fails, install Ansible manually.
By default, bootstrap moves existing repository configurations into a backup directory.
This leaves only the required repositories enabled.
On EL, the backup directory is /etc/yum.repos.d/backup.
On Debian and Ubuntu, it is /etc/apt/backup.
To keep existing repository configurations, use -k|--keep:
8 - Slim Installation
Use Slim Installation to deploy PostgreSQL without the monitoring infrastructure. It installs ETCD, PGSQL, and part of NODE. It does not install INFRA, monitoring services, or a local software repository.
- You only need PostgreSQL.
- You have limited CPU or memory resources.
- You already have an external monitoring system.
- You do not need Grafana dashboards.
On one node, the omitted infrastructure uses approximately 0.2 vCPU and 500 MB of memory.
The Web UI and local software repository require INFRA. Slim Installation does not supply these features. Offline installation supports only one node in this mode. For multiple nodes, Slim Installation requires online package access.
Overview
- Download Pigsty and enter the source directory.
- Select the
slimconfiguration template with./configure -g -c slim. - Run
./slim.ymlinstead of./deploy.yml.
demo/install-slim.cast — /demo/install-slim.cast
Description
Slim Installation configures these components:
| Component | Required | Description |
|---|---|---|
patroni | ⚠️ Required | Bootstrap HA PostgreSQL cluster |
etcd | ⚠️ Required | Meta database dependency (DCS) for Patroni |
pgbouncer | ✔️ Optional | PostgreSQL connection pooler |
vip-manager | ✔️ Optional | L2 VIP binding to PostgreSQL cluster primary |
haproxy | ✔️ Optional | Auto-routing services via Patroni health checks |
chronyd | ✔️ Optional | Time synchronization with NTP server |
tuned | ✔️ Optional | Node tuning template and kernel parameter management |
You can disable all optional components through the configuration. Patroni and etcd remain required.
Without INFRA, Nginx does not serve a local software repository to other nodes. Thus, offline Slim Installation supports only one node.
Configuration
The conf/slim.yml template defines this single-node deployment:
Deployment
Use the slim.yml playbook for deployment.
Run it from the Pigsty source directory:
HA Cluster
To deploy an HA cluster, add nodes to both the etcd and pg-meta groups.
This example uses three nodes:
| ID | NODE | PGSQL | INFRA | ETCD |
|---|---|---|---|---|
| 1 | 10.10.10.10 | pg-meta-1 | No INFRA module | etcd-1 |
| 2 | 10.10.10.11 | pg-meta-2 | No INFRA module | etcd-2 |
| 3 | 10.10.10.12 | pg-meta-3 | No INFRA module | etcd-3 |
9 - Security Recommendations
The default configuration supports local demonstrations and development on a trusted intranet. If other hosts can reach the deployment, examine the credentials, network access, and sensitive files.
For production, also review the Security Model, Compliance, and Security Considerations.
Passwords
Pigsty publishes its default credentials in the source code and documentation. Do not use these credentials in production.
Run the configuration wizard with -g to generate random passwords:
The wizard replaces the built-in parameters and example credentials that it recognizes. It does not replace these credentials:
- The pgBackRest
cipher_pass. - Silo user passwords and selected example passwords in
ha/safe. - Database, object-storage, or application credentials that you added yourself.
After generation, examine pigsty.yml.
Replace every credential that the wizard did not change.
The wizard prints generated passwords to the terminal. Protect terminal records and automation logs that contain these passwords. See the Default Credentials Checklist for the complete scope.
Firewall
The default value of node_firewall_mode is zone.
This mode trusts the intranet defined by node_firewall_intranet.
It restricts access to ports from public networks.
| Port | Service | Public by Default |
|---|---|---|
22 | SSH | Yes |
80 | Nginx HTTP | Yes |
443 | Nginx HTTPS | Yes |
5432 | PostgreSQL | Not in the base default; exposed additionally by the demo pigsty.yml |
For production, normally remove port 5432 from the demonstration configuration.
If applications require direct database access, permit only their source addresses.
Apply these restrictions in the cloud security group, host firewall, and PostgreSQL HBA rules.
Make sure that the intranet definition matches your trusted network. The default RFC 1918 address ranges can include networks that you do not trust. Do not automatically trust office networks, container networks, or other tenant networks.
Files
These files and directories contain sensitive information:
| File or directory | Contents |
|---|---|
pigsty.yml | System and application credentials, node definitions, and service configuration |
files/pki/ca/ca.key | Local CA private key |
| Administration account SSH private key | Access credentials for managed nodes |
files/pki/misc/*.key | Client-certificate private keys |
/pg/tmp/pg-user-*.sql | SQL files with plaintext passwords from user creation |
Restrict access to the administration node and configuration repository. Do not commit complete inventories or private keys to public repositories. Keep controlled backups of the CA private key and required configuration.
Related Documentation
- Security and Compliance introduces the security model.
- Authentication explains HBA rules, passwords, and client certificates.
- Encrypted Communication explains the CA, TLS, and server verification.
- Production Security Considerations supplies the complete deployment checklist.