Manual Recovery
You can use the pgsql-pitr.yml playbook to perform PITR, but in some cases, you may want to manually execute PITR using pgbackrest primitives directly for fine-grained control.
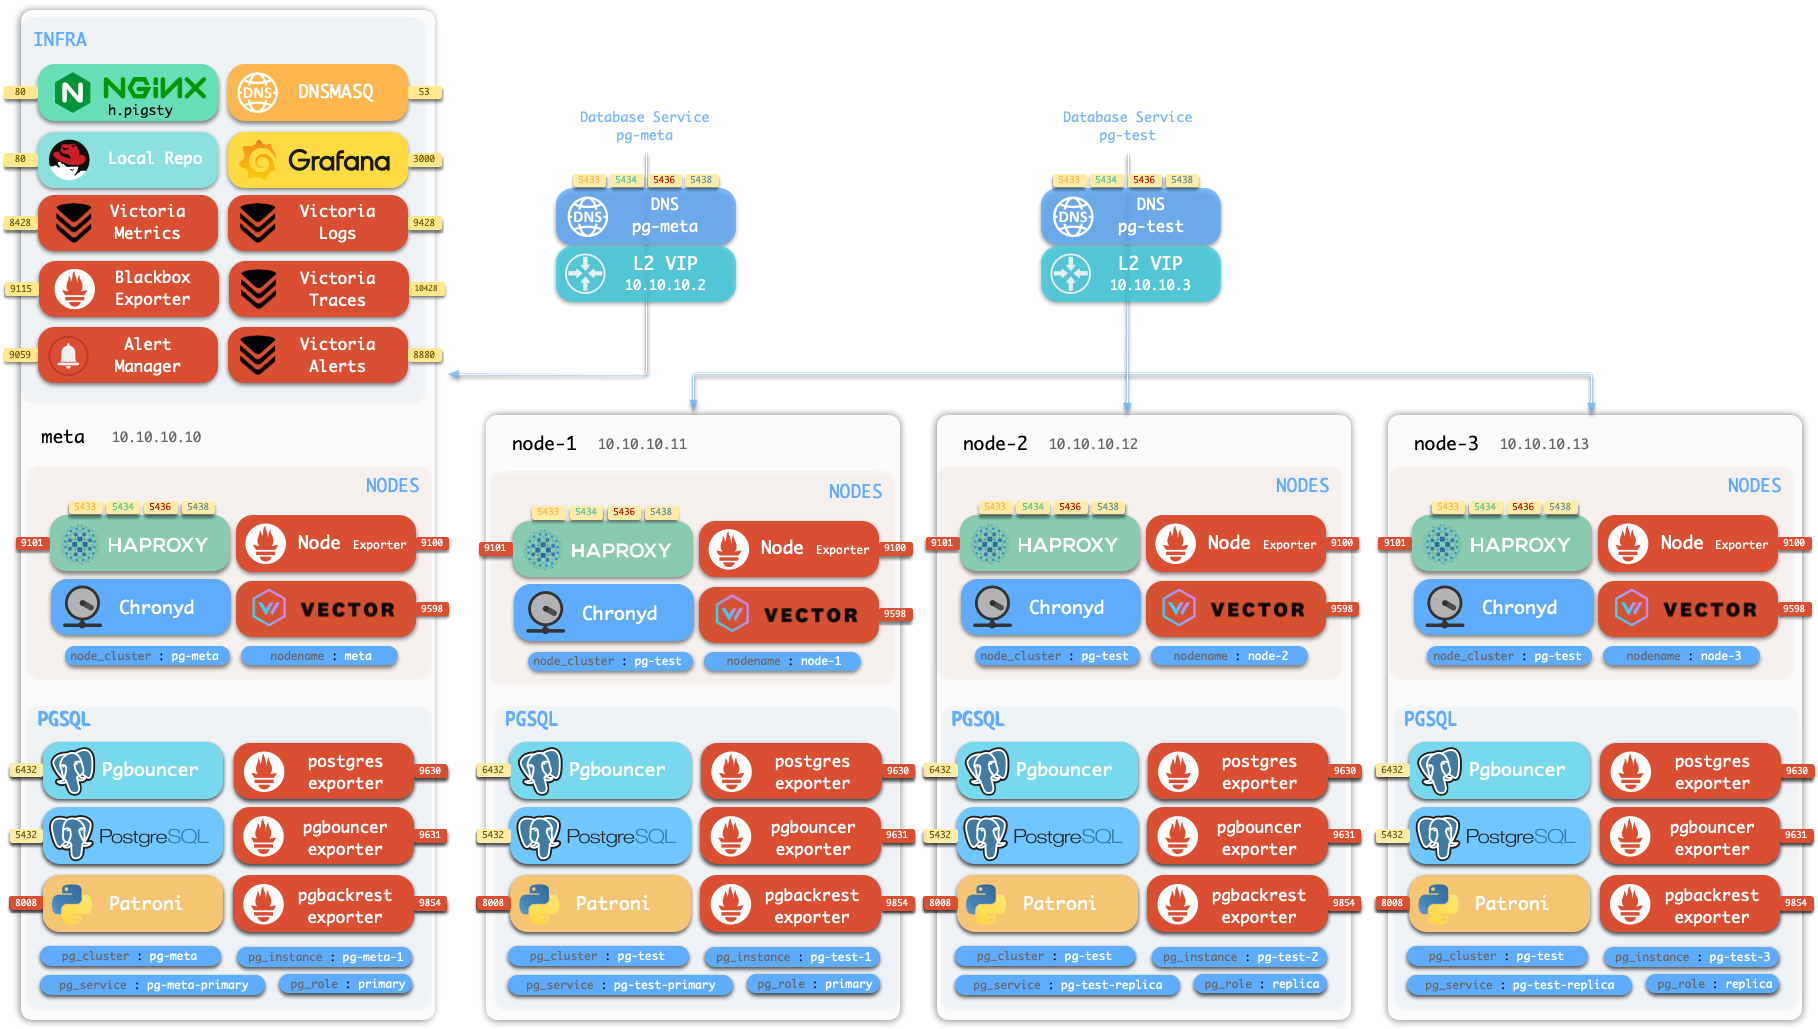
We will use a four-node sandbox cluster with MinIO backup repository to demonstrate the process.
Initialize Sandbox
Use vagrant or terraform to prepare a four-node sandbox environment, then:
curl https://repo.pigsty.io/get | bash; cd ~/pigsty/
./configure -c full
./install
Now operate as the admin user (or dbsu) on the admin node.
Check Backup
To check backup status, you need to switch to the postgres user and use the pb command:
sudo su - postgres    # Switch to dbsu: postgres user
pb info               # Print pgbackrest backup info
pb is an alias for pgbackrest that automatically retrieves the stanza name from pgbackrest configuration.
function pb() {
    local stanza=$(grep -o '\[[^][]*]' /etc/pgbackrest/pgbackrest.conf | head -n1 | sed 's/.*\[\([^]]*\)].*/\1/')
    pgbackrest --stanza=$stanza $@
}
You can see the initial backup information, which is a full backup:
root@pg-meta-1:~# pb info
stanza: pg-meta
    status: ok
    cipher: aes-256-cbc

    db (current)
        wal archive min/max (17): 000000010000000000000001/000000010000000000000007

        full backup: 20250713-022731F
            timestamp start/stop: 2025-07-13 02:27:31+00 / 2025-07-13 02:27:33+00
            wal start/stop: 000000010000000000000004 / 000000010000000000000004
            database size: 44MB, database backup size: 44MB
            repo1: backup size: 8.4MB
The backup completed at 2025-07-13 02:27:33+00, which is the earliest time you can restore to.
Since WAL archiving is active, you can restore to any point in time after the backup, up to the end of WAL (i.e., now).
Generate Heartbeats
You can generate some heartbeats to simulate workload. /pg-bin/pg-heartbeat is for this purpose,
it writes a heartbeat timestamp to the monitor.heartbeat table every second.
make rh # Run heartbeat: ssh 10.10.10.10 'sudo -iu postgres /pg/bin/pg-heartbeat'ssh 10.10.10.10 'sudo -iu postgres /pg/bin/pg-heartbeat' cls | ts | lsn | lsn_int | txid | status | now | elapse
---------+-------------------------------+------------+-----------+------+---------+-----------------+----------
pg-meta | 2025-07-13 03:01:20.318234+00 | 0/115BF5C0 | 291239360 | 4812 | leading | 03:01:20.318234 | 00:00:00You can even add more workload to the cluster. Let’s use pgbench to generate some random writes:
make ri     # Initialize pgbench
make rw     # Run pgbench read-write workload
pgbench -is10 postgres://dbuser_meta:[email protected]:5433/meta
while true; do pgbench -nv -P1 -c4 --rate=64 -T10 postgres://dbuser_meta:[email protected]:5433/meta; donewhile true; do pgbench -nv -P1 -c4 --rate=64 -T10 postgres://dbuser_meta:[email protected]:5433/meta; done
pgbench (17.5 (Homebrew), server 17.4 (Ubuntu 17.4-1.pgdg24.04+2))
progress: 1.0 s, 60.9 tps, lat 7.295 ms stddev 4.219, 0 failed, lag 1.818 ms
progress: 2.0 s, 69.1 tps, lat 6.296 ms stddev 1.983, 0 failed, lag 1.397 ms
...PITR Manual
Now let’s choose a recovery point in time, such as 2025-07-13 03:03:03+00, which is a point after the initial backup (and heartbeat).
To perform manual PITR, use the pg-pitr tool:
$ pg-pitr -t "2025-07-13 03:03:00+00"
It will generate instructions for performing the recovery, typically requiring four steps:
Perform time PITR on pg-meta
[1. Stop PostgreSQL] ===========================================
   1.1 Pause Patroni (if there are any replicas)
       $ pg pause <cls>  # Pause patroni auto-failover
   1.2 Shutdown Patroni
       $ pt-stop         # sudo systemctl stop patroni
   1.3 Shutdown Postgres
       $ pg-stop         # pg_ctl -D /pg/data stop -m fast

[2. Perform PITR] ===========================================
   2.1 Restore Backup
       $ pgbackrest --stanza=pg-meta --type=time --target='2025-07-13 03:03:00+00' restore
   2.2 Start PG to Replay WAL
       $ pg-start        # pg_ctl -D /pg/data start
   2.3 Validate and Promote
     - If database content is ok, promote it to finish recovery, otherwise goto 2.1
       $ pg-promote      # pg_ctl -D /pg/data promote
[3. Restore Primary] ===========================================
   3.1 Enable Archive Mode (Restart Required)
       $ psql -c 'ALTER SYSTEM SET archive_mode = on;'
   3.1 Restart Postgres to Apply Changes
       $ pg-restart      # pg_ctl -D /pg/data restart
   3.3 Restart Patroni
       $ pt-restart      # sudo systemctl restart patroni

[4. Restore Cluster] ===========================================
   4.1 Re-Init All [**REPLICAS**] (if any)
       - 4.1.1 option 1: restore replicas with same pgbackrest cmd (require central backup repo)
           $ pgbackrest --stanza=pg-meta --type=time --target='2025-07-13 03:03:00+00' restore
       - 4.1.2 option 2: nuke the replica data dir and restart patroni (may take long time to restore)
           $ rm -rf /pg/data/*; pt-restart
       - 4.1.3 option 3: reinit with patroni, which may fail if primary lsn < replica lsn
           $ pg reinit pg-meta
   4.2 Resume Patroni
       $ pg resume pg-meta
   4.3 Full Backup (optional)
       $ pg-backup full      # Recommended to perform new full backup after PITR
Single Node Example
Let’s start with the simple single-node pg-meta cluster as a simpler example.
Shutdown Database
pt-stop # sudo systemctl stop patroni, shutdown patroni (and postgres)# Optional, because postgres will be shutdown by patroni if patroni is not paused
$ pg_stop # pg_ctl -D /pg/data stop -m fast, shutdown postgres
pg_ctl: PID file "/pg/data/postmaster.pid" does not exist
Is server running?
$ pg-ps # Print postgres related processes
UID PID PPID C STIME TTY STAT TIME CMD
postgres 31048 1 0 02:27 ? Ssl 0:19 /usr/sbin/pgbouncer /etc/pgbouncer/pgbouncer.ini
postgres 32026 1 0 02:28 ? Ssl 0:03 /usr/bin/pg_exporter ...
postgres 35510 35480 0 03:01 pts/2 S+ 0:00 /bin/bash /pg/bin/pg-heartbeatMake sure local postgres is not running, then execute the recovery commands given in the manual:
Restore Backup
pgbackrest --stanza=pg-meta --type=time --target='2025-07-13 03:03:00+00' restorepostgres@pg-meta-1:~$ pgbackrest --stanza=pg-meta --type=time --target='2025-07-13 03:03:00+00' restore
2025-07-13 03:17:07.443 P00 INFO: restore command begin 2.54.2: ...
2025-07-13 03:17:07.470 P00 INFO: repo1: restore backup set 20250713-022731F, recovery will start at 2025-07-13 02:27:31
2025-07-13 03:17:07.471 P00 INFO: remove invalid files/links/paths from '/pg/data'
2025-07-13 03:17:08.523 P00 INFO: write updated /pg/data/postgresql.auto.conf
2025-07-13 03:17:08.527 P00 INFO: restore size = 44MB, file total = 1436
2025-07-13 03:17:08.527 P00 INFO: restore command end: completed successfully (1087ms)Verify Data
We don’t want patroni HA to take over until we’re sure the data is correct, so start postgres manually:
pg-startwaiting for server to start....2025-07-13 03:19:33.133 UTC [39294] LOG: redirecting log output to logging collector process
2025-07-13 03:19:33.133 UTC [39294] HINT: Future log output will appear in directory "/pg/log/postgres".
done
server startedNow you can check the data to see if it’s at the point in time you want. You can verify by checking the latest timestamp in business tables, or in this case, check via the heartbeat table.
postgres@pg-meta-1:~$ psql -c 'table monitor.heartbeat'
   id    |              ts               |    lsn    | txid
---------+-------------------------------+-----------+------
 pg-meta | 2025-07-13 03:02:59.214104+00 | 302005504 | 4912
The timestamp is just before our specified point in time! (2025-07-13 03:03:00+00).
If this is not the point in time you want, you can repeat the recovery with a different time point.
Since recovery is performed incrementally and in parallel, it’s very fast.
You can retry until you find the correct point in time.
Promote Primary
The recovered postgres cluster is in recovery mode, so it will reject any write operations until promoted to primary.
These recovery parameters are generated by pgBackRest in the configuration file.
postgres@pg-meta-1:~$ cat /pg/data/postgresql.auto.conf
# Do not edit this file or use ALTER SYSTEM manually!
# It is managed by Pigsty & Ansible automatically!

# Recovery settings generated by pgBackRest restore on 2025-07-13 03:17:08
archive_mode = 'off'
restore_command = 'pgbackrest --stanza=pg-meta archive-get %f "%p"'
recovery_target_time = '2025-07-13 03:03:00+00'
If the data is correct, you can promote it to primary, marking it as the new leader and ready to accept writes.
pg-promote
waiting for server to promote.... done
server promoted
psql -c 'SELECT pg_is_in_recovery()' # 'f' means promoted to primary
pg_is_in_recovery
-------------------
f
(1 row)Once promoted, the database cluster will enter a new timeline (leader epoch). If there is any write traffic, it will be written to the new timeline.
Restore Cluster
Finally, not only do you need to restore data, but also restore cluster state, such as:
- patroni takeover
- archive mode
- backup set
- replicas
Patroni Takeover
Your postgres was started directly. To restore HA takeover, you need to start the patroni service:
pt-start # sudo systemctl start patronipg resume pg-meta # Resume patroni auto-failover (if previously paused)Archive Mode
archive_mode is disabled during recovery by pgbackrest.
If you want new leader writes to be archived to the backup repository, you also need to enable the archive_mode configuration.
psql -c 'show archive_mode'

 archive_mode
--------------
 off
psql -c 'ALTER SYSTEM RESET archive_mode;'
psql -c 'SELECT pg_reload_conf();'
psql -c 'show archive_mode'# You can also directly edit postgresql.auto.conf and reload with pg_ctl
sed -i '/archive_mode/d' /pg/data/postgresql.auto.conf
pg_ctl -D /pg/data reloadBackup Set
It’s generally recommended to perform a new full backup after PITR, but this is optional.
Replicas
If your postgres cluster has replicas, you also need to perform PITR on each replica. Alternatively, a simpler approach is to remove the replica data directory and restart patroni, which will reinitialize the replica from the primary. We’ll cover this scenario in the next multi-node cluster example.
Multi-Node Example
Now let’s use the three-node pg-test cluster as a PITR example.
Feedback
Was this page helpful?
Thanks for the feedback! Please let us know how we can improve.
Sorry to hear that. Please let us know how we can improve.