This is the multi-page printable view of this section.
Click here to print.
Return to the regular view of this page.
Software
Software and tools that use PostgreSQL can be managed by the docker daemon
PostgreSQL is the most popular database in the world, and countless software is built on PostgreSQL, around PostgreSQL, or serves PostgreSQL itself, such as
- “Application software” that uses PostgreSQL as the preferred database
- “Tooling software” that serves PostgreSQL software development and management
- “Database software” that derives, wraps, forks, modifies, or extends PostgreSQL
And Pigsty just have a series of Docker Compose templates for these software, application and databases:
| Name |
Website |
Type |
State |
Port |
Domain |
Description |
| Supabase |
Supabase |
DB |
GA |
8000 |
supa.pigsty |
OSS Firebase Alternative, Backend as Platform |
| PolarDB |
PolarDB |
DB |
GA |
5532 |
|
OSS RAC for PostgreSQL |
| FerretDB |
FerretDB |
DB |
GA |
27017 |
|
OSS Mongo Alternative base on PostgreSQL |
| MinIO |
MinIO |
DB |
GA |
9000 |
sss.pigsty |
OSS AWS S3 Alternative, Simple Storage Service |
| EdgeDB |
EdgeDB |
DB |
TBD |
|
|
OSS Graph Database base on PostgreSQL |
| NocoDB |
NocoDB |
APP |
GA |
8080 |
noco.pigsty |
OSS Airtable Alternative over PostgreSQL |
| Odoo |
Odoo |
APP |
GA |
8069 |
odoo.pigsty |
OSS ERP Software base on PostgreSQL |
| Dify |
Dify |
APP |
GA |
8001 |
dify.pigsty |
OSS AI Workflow Orachestration & LLMOps Platform |
| Jupyter |
Jupyter |
APP |
GA |
|
lab.pigsty |
OSS AI Python Notebook & Data Analysis IDE |
| Gitea |
Gitea |
APP |
GA |
8889 |
git.pigsty |
OSS DevOps Git Service |
| Wiki |
Wiki.js |
APP |
GA |
9002 |
wiki.pigsty |
OSS Wiki Software |
| GitLab |
GitLab |
APP |
TBD |
|
|
OSS GitHub Alternative, Code Management Platform |
| Mastodon |
Mastodon |
APP |
TBD |
|
|
OSS Decentralized Social Network |
| Keycloak |
Keycloak |
APP |
TBD |
|
|
OSS Identity & Access Management Component |
| Harbour |
Harbour |
APP |
TBD |
|
|
OSS Docker/K8S Image Repository |
| Confluence |
Confluence |
APP |
TBD |
|
|
Enterprise Knowledge Management System |
| Jira |
Jira |
APP |
TBD |
|
|
Enterprise Project Management Tools |
| Zabbix |
Zabbix 7 |
APP |
TBD |
|
|
OSS Monitoring Platform for Enterprise |
| Grafana |
Grafana |
APP |
TBD |
|
|
Dashboard, Data Visualization & Monitoring Platform |
| Metabase |
Metabase |
APP |
GA |
9004 |
mtbs.pigsty |
Fast analysis of data from multiple data sources |
| ByteBase |
ByteBase |
APP |
GA |
8887 |
ddl.pigsty |
Database Migration Tool for PostgreSQL |
| Kong |
Kong |
TOOL |
GA |
8000 |
api.pigsty |
OSS API Gateway based on Nginx/OpenResty |
| PostgREST |
PostgREST |
TOOL |
GA |
8884 |
api.pigsty |
Generate RESTAPI from PostgreSQL Schemas |
| pgAdmin4 |
pgAdmin4 |
TOOL |
GA |
8885 |
adm.pigsty |
PostgreSQL GUI Admin Tools |
| pgWeb |
pgWeb |
TOOL |
GA |
8886 |
cli.pigsty |
PostgreSQL Web GUI Client |
| SchemaSpy |
SchemaSpy |
TOOL |
TBD |
|
|
Dump & Visualize PostgreSQL Schema |
| pgBadger |
pgBadger |
TOOL |
TBD |
|
|
PostgreSQL Log Analysis |
| pg_exporter |
pg_exporter |
TOOL |
GA |
9630 |
|
Expose PostgreSQL & Pgbouncer Metrics for Prometheus |
How to prepare Docker?
To run docker compose templates, you need to install the
DOCKER module on the
node,
If you don’t have the Internet access or having firewall issues, you may need to configure a DockerHub proxy, check the
tutorial.
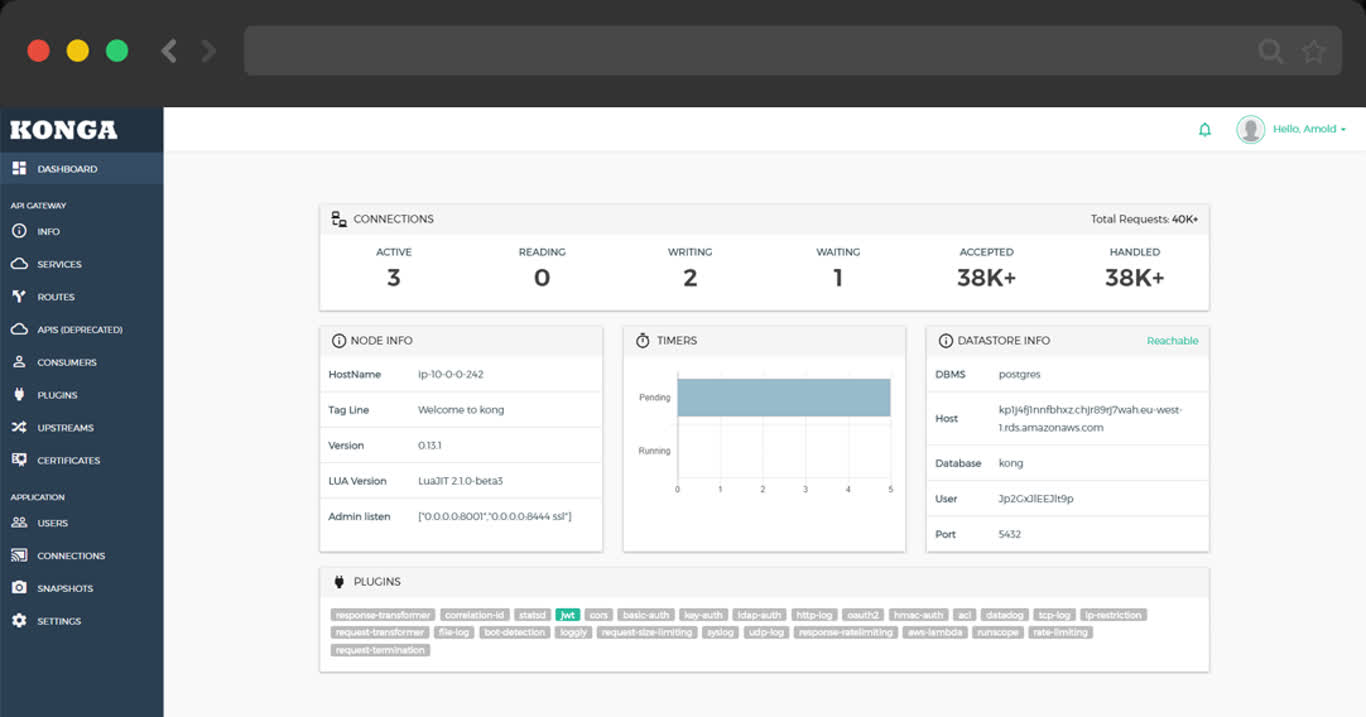
1 - Kong: the Nginx API Gateway
Learn how to deploy Kong, the API gateway, with Docker Compose and use external PostgreSQL as the backend database
TL;DR
cd app/kong ; docker-compose up -d
make up         # pull up kong with docker-compose
make ui         # run swagger ui container
make log        # tail -f kong logs
make info       # introspect kong with jq
make stop       # stop kong container
make clean      # remove kong container
make rmui       # remove swagger ui container
make pull       # pull latest kong image
make rmi        # remove kong image
make save       # save kong image to /tmp/kong.tgz
make load       # load kong image from /tmp
Scripts
- Default Port: 8000
- Default SSL Port: 8443
- Default Admin Port: 8001
- Default Postgres Database:
postgres://dbuser_kong:[email protected]:5432/kong
# postgres://dbuser_kong:[email protected]:5432/kong
- { name: kong, owner: dbuser_kong, revokeconn: true , comment: kong the api gateway database }
- { name: dbuser_kong, password: DBUser.Kong , pgbouncer: true , roles: [ dbrole_admin ] }
2 - Jupyter: AI Notebook & IDE
Run Jupyter Lab in container, and access PostgreSQL database
Run jupyter notebook with docker, you have to:
-
- change the default password in
.env: JUPYTER_TOKEN
-
- create data dir with proper permission:
make dir, owned by 1000:100
-
make up to pull up jupyter with docker compose
cd ~/pigsty/app/jupyter ; make dir up
Visit http://lab.pigsty or http://10.10.10.10:8888, the default password is pigsty
Prepare
Create a data directory /data/jupyter, with the default uid & gid 1000:100:
make dir # mkdir -p /data/jupyter; chown -R 1000:100 /data/jupyter
Connect to Postgres
Use the jupyter terminal to install psycopg2-binary & psycopg2 package.
pip install psycopg2-binary psycopg2

# install with a mirror
pip install -i https://pypi.tuna.tsinghua.edu.cn/simple psycopg2-binary psycopg2

pip install --upgrade pip
pip config set global.index-url https://pypi.tuna.tsinghua.edu.cn/simple
Or installation with conda:
conda config --add channels https://mirrors.tuna.tsinghua.edu.cn/anaconda/pkgs/free/
conda config --add channels https://mirrors.tuna.tsinghua.edu.cn/anaconda/pkgs/main/
conda config --add channels https://mirrors.tuna.tsinghua.edu.cn/anaconda/cloud/conda-forge/
then use the driver in your notebook
import psycopg2

conn = psycopg2.connect('postgres://dbuser_dba:[email protected]:5432/meta')
cursor = conn.cursor()
cursor.execute('SELECT * FROM pg_stat_activity')
for i in cursor.fetchall():
    print(i)
Alias
make up         # pull up jupyter with docker compose
make dir        # create required /data/jupyter and set owner
make run        # launch jupyter with docker
make view       # print jupyter access point
make log        # tail -f jupyter logs
make info       # introspect jupyter with jq
make stop       # stop jupyter container
make clean      # remove jupyter container
make pull       # pull latest jupyter image
make rmi        # remove jupyter image
make save       # save jupyter image to /tmp/docker/jupyter.tgz
make load       # load jupyter image from /tmp/docker/jupyter.tgz
3 - Gitea: Simple Self-Hosting Git Service
Launch the self-hosting Git service with Gitea and Pigsty managed PostgreSQL
Public Demo: http://git.pigsty.io
TL;DR
cd ~/pigsty/app/gitea; make up
Pigsty use 8889 port for gitea by default
http://git.pigsty or http://10.10.10.10:8889
make up      # pull up gitea with docker-compose in minimal mode
make run     # launch gitea with docker , local data dir and external PostgreSQL
make view    # print gitea access point
make log     # tail -f gitea logs
make info    # introspect gitea with jq
make stop    # stop gitea container
make clean   # remove gitea container
make pull    # pull latest gitea image
make rmi     # remove gitea image
make save    # save gitea image to /tmp/gitea.tgz
make load    # load gitea image from /tmp
PostgreSQL Preparation
Gitea use built-in SQLite as default metadata storage, you can let Gitea use external PostgreSQL by setting connection string environment variable
# postgres://dbuser_gitea:[email protected]:5432/gitea
db:   { name: gitea, owner: dbuser_gitea, comment: gitea primary database }
user: { name: dbuser_gitea , password: DBUser.gitea, roles: [ dbrole_admin ] }
4 - Wiki.js: OSS Wiki Software
How to self-hosting your own wikipedia with Wiki.js and use Pigsty managed PostgreSQL as the backend database
Public Demo: http://wiki.pigsty.io
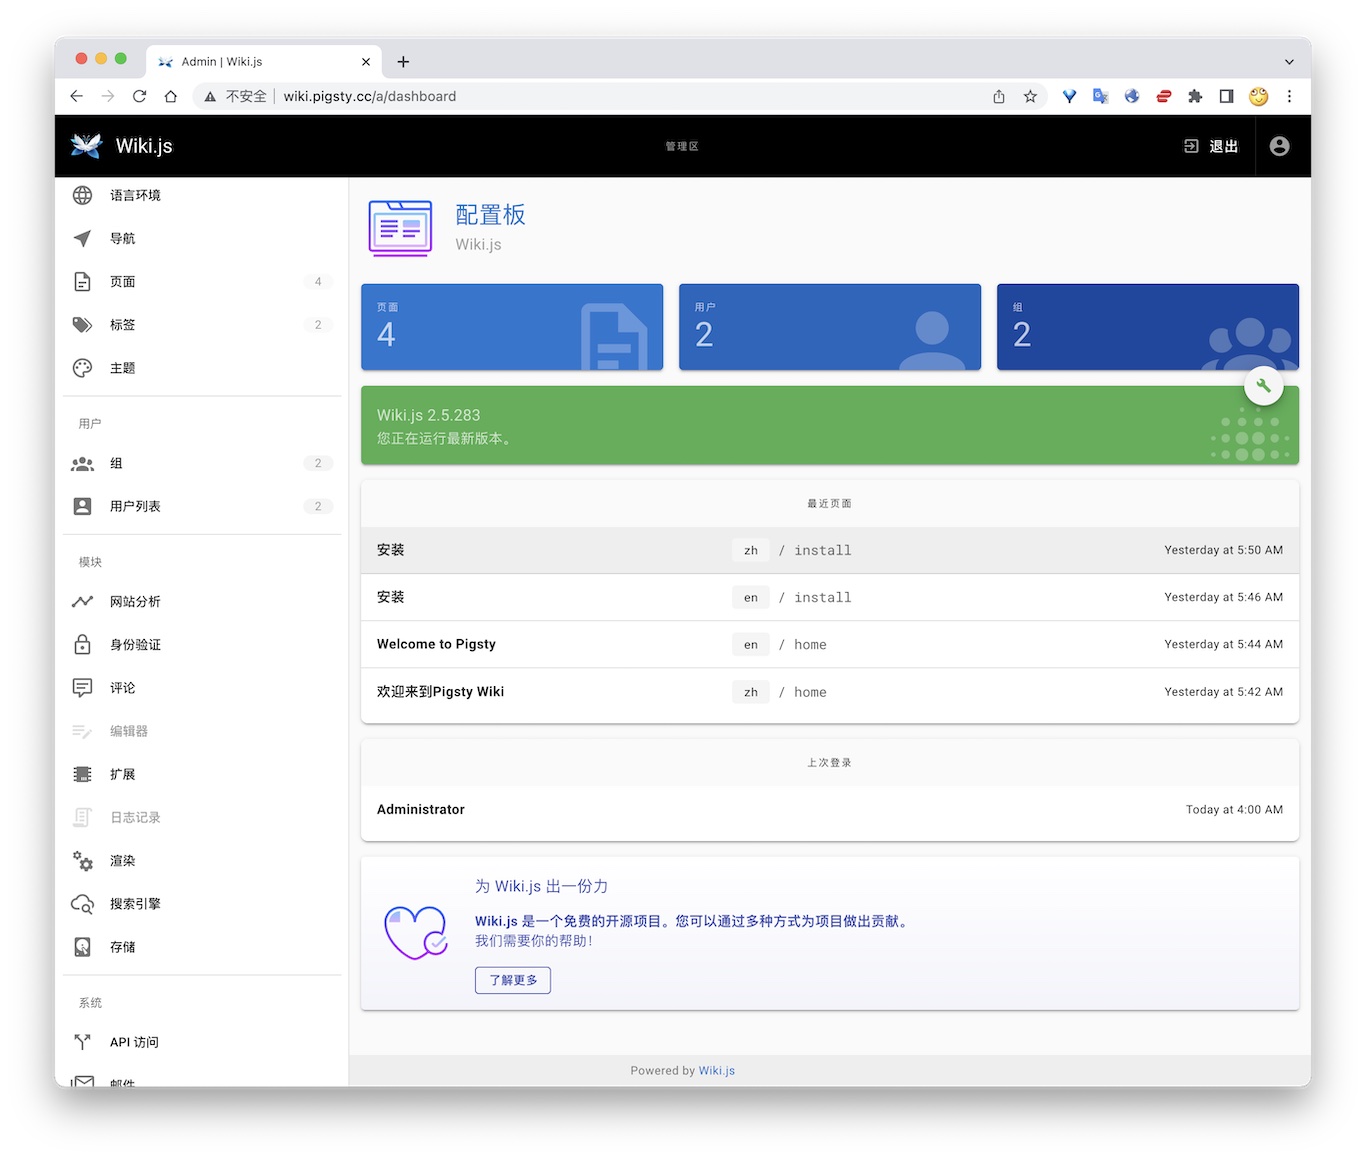
TL; DR
cd app/wiki ; docker-compose up -d
Postgres Preparation
# postgres://dbuser_wiki:[email protected]:5432/wiki
- { name: wiki, owner: dbuser_wiki, revokeconn: true , comment: wiki the api gateway database }
- { name: dbuser_wiki, password: DBUser.Wiki , pgbouncer: true , roles: [ dbrole_admin ] }
bin/createuser pg-meta dbuser_wiki
bin/createdb   pg-meta wiki
Configuration
version: "3"
services:
  wiki:
    container_name: wiki
    image: requarks/wiki:2
    environment:
      DB_TYPE: postgres
      DB_HOST: 10.10.10.10
      DB_PORT: 5432
      DB_USER: dbuser_wiki
      DB_PASS: DBUser.Wiki
      DB_NAME: wiki
    restart: unless-stopped
    ports:
      - "9002:3000"
Access
- Default Port for wiki: 9002
# add to nginx_upstream
- { name: wiki  , domain: wiki.pigsty.io , endpoint: "127.0.0.1:9002"   }
./infra.yml -t nginx_config
ansible all -b -a 'nginx -s reload'
5 - Minio: OSS AWS S3 Alternative
Launch minio with docker for testing & development
Public Demo: http://sss.pigsty.io
Credential: admin / pigsty.minio
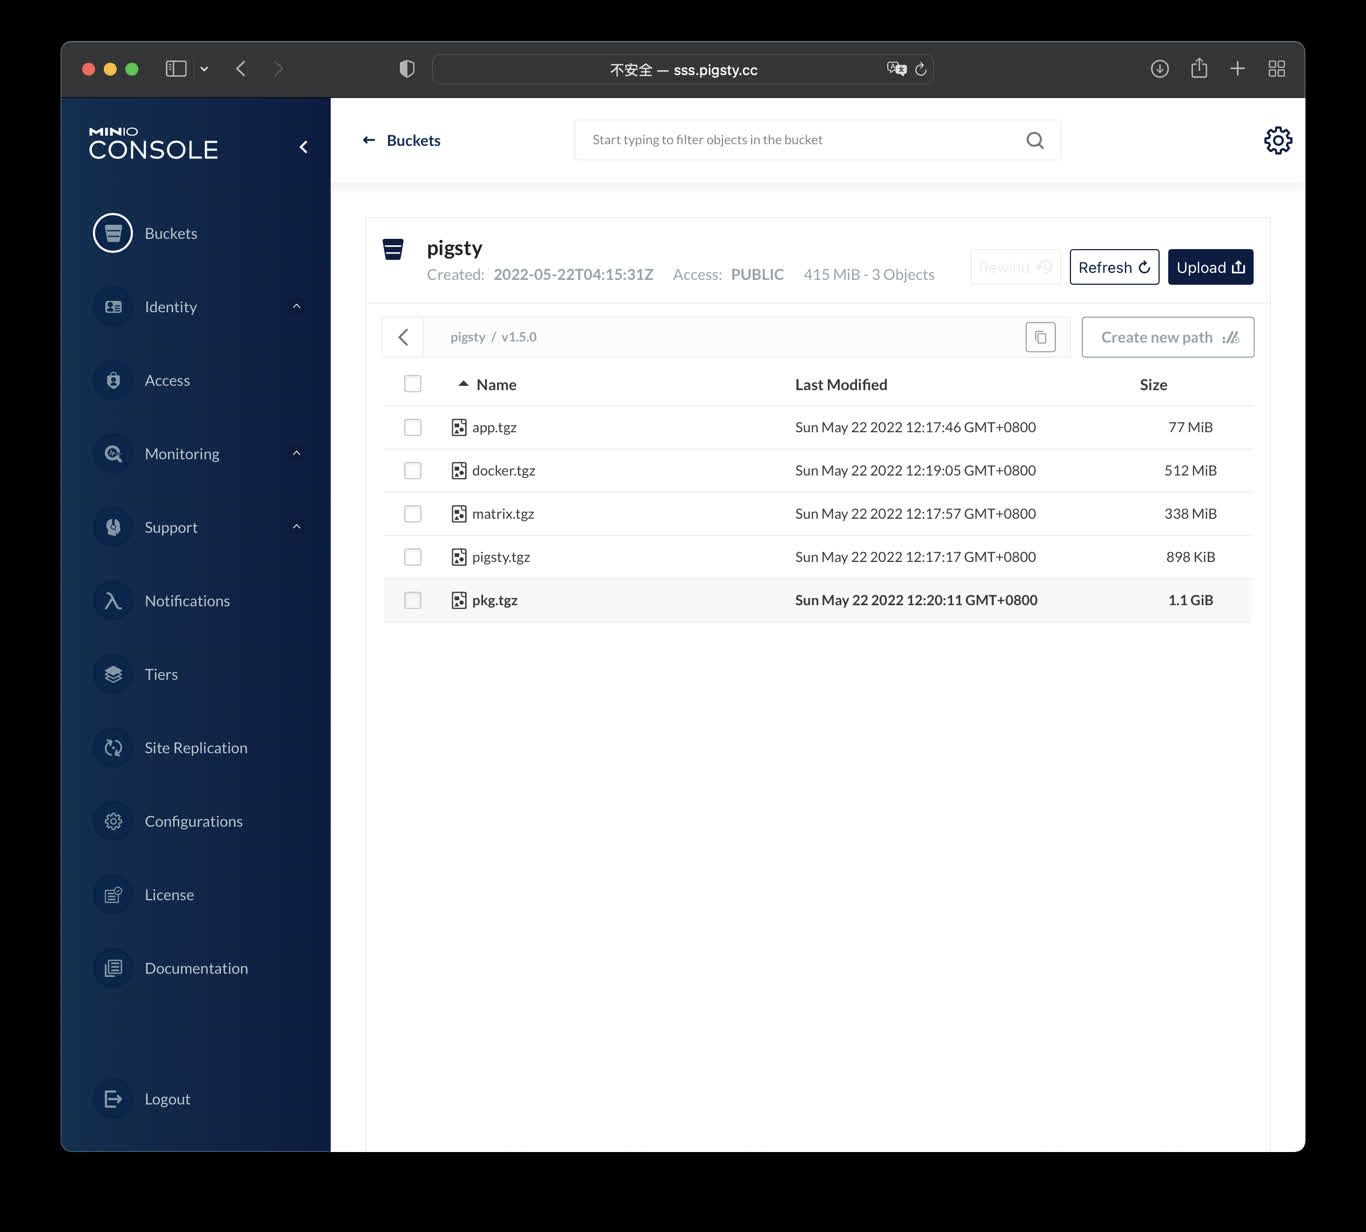
TL; DR
Launch minio (s3) service on 9000 & 9001
cd ~/pigsty/app/minio ; docker-compose up -d
docker run -p 9000:9000 -p 9001:9001 \
  -e "MINIO_ROOT_USER=admin" \
  -e "MINIO_ROOT_PASSWORD=pigsty.minio" \
  minio/minio server /data --console-address ":9001"
visit http://10.10.10.10:9000 with user admin and password pigsty.minio
make up         # pull up minio with docker-compose
make run        # launch minio with docker
make view       # print minio access point
make log        # tail -f minio logs
make info       # introspect minio with jq
make stop       # stop minio container
make clean      # remove minio container
make pull       # pull latest minio image
make rmi        # remove minio image
make save       # save minio image to /tmp/minio.tgz
make load       # load minio image from /tmp
6 - ByteBase: PG Schema Migration
Self-hosting bytebase with PostgreSQL managed by Pigsty
ByteBase
ByteBase is a database schema change management tool, which is a tool for database schema changes. The following command will start a ByteBase on the meta node 8887 port by default.
mkdir -p /data/bytebase/data;
docker run --init --name bytebase --restart always --detach --publish 8887:8887 --volume /data/bytebase/data:/var/opt/bytebase \
    bytebase/bytebase:1.0.4 --data /var/opt/bytebase --host http://ddl.pigsty --port 8887
Then visit http://10.10.10.10:8887/ 或 http://ddl.pigsty to access bytebase console. You have to “Create Project”, “Env”, “Instance”, “Database” to perform schema migration.
Public Demo: http://ddl.pigsty.io
Default username & password: admin / pigsty

Bytebase Overview
Schema Migrator for PostgreSQL
Visit http://ddl.pigsty or http://10.10.10.10:8887
make up         # pull up bytebase with docker-compose in minimal mode
make run        # launch bytebase with docker , local data dir and external PostgreSQL
make view       # print bytebase access point
make log        # tail -f bytebase logs
make info       # introspect bytebase with jq
make stop       # stop bytebase container
make clean      # remove bytebase container
make pull       # pull latest bytebase image
make rmi        # remove bytebase image
make save       # save bytebase image to /tmp/bytebase.tgz
make load       # load bytebase image from /tmp
PostgreSQL Preparation
Bytebase use its internal PostgreSQL database by default, You can use external PostgreSQL for higher durability.
# postgres://dbuser_bytebase:[email protected]:5432/bytebase
db:   { name: bytebase, owner: dbuser_bytebase, comment: bytebase primary database }
user: { name: dbuser_bytebase , password: DBUser.Bytebase, roles: [ dbrole_admin ] }
if you wish to user an external PostgreSQL, drop monitor extensions and views & pg_repack
DROP SCHEMA monitor CASCADE;
DROP EXTENSION pg_repack;
After bytebase initialized, you can create them back with /pg/tmp/pg-init-template.sql
psql bytebase < /pg/tmp/pg-init-template.sql
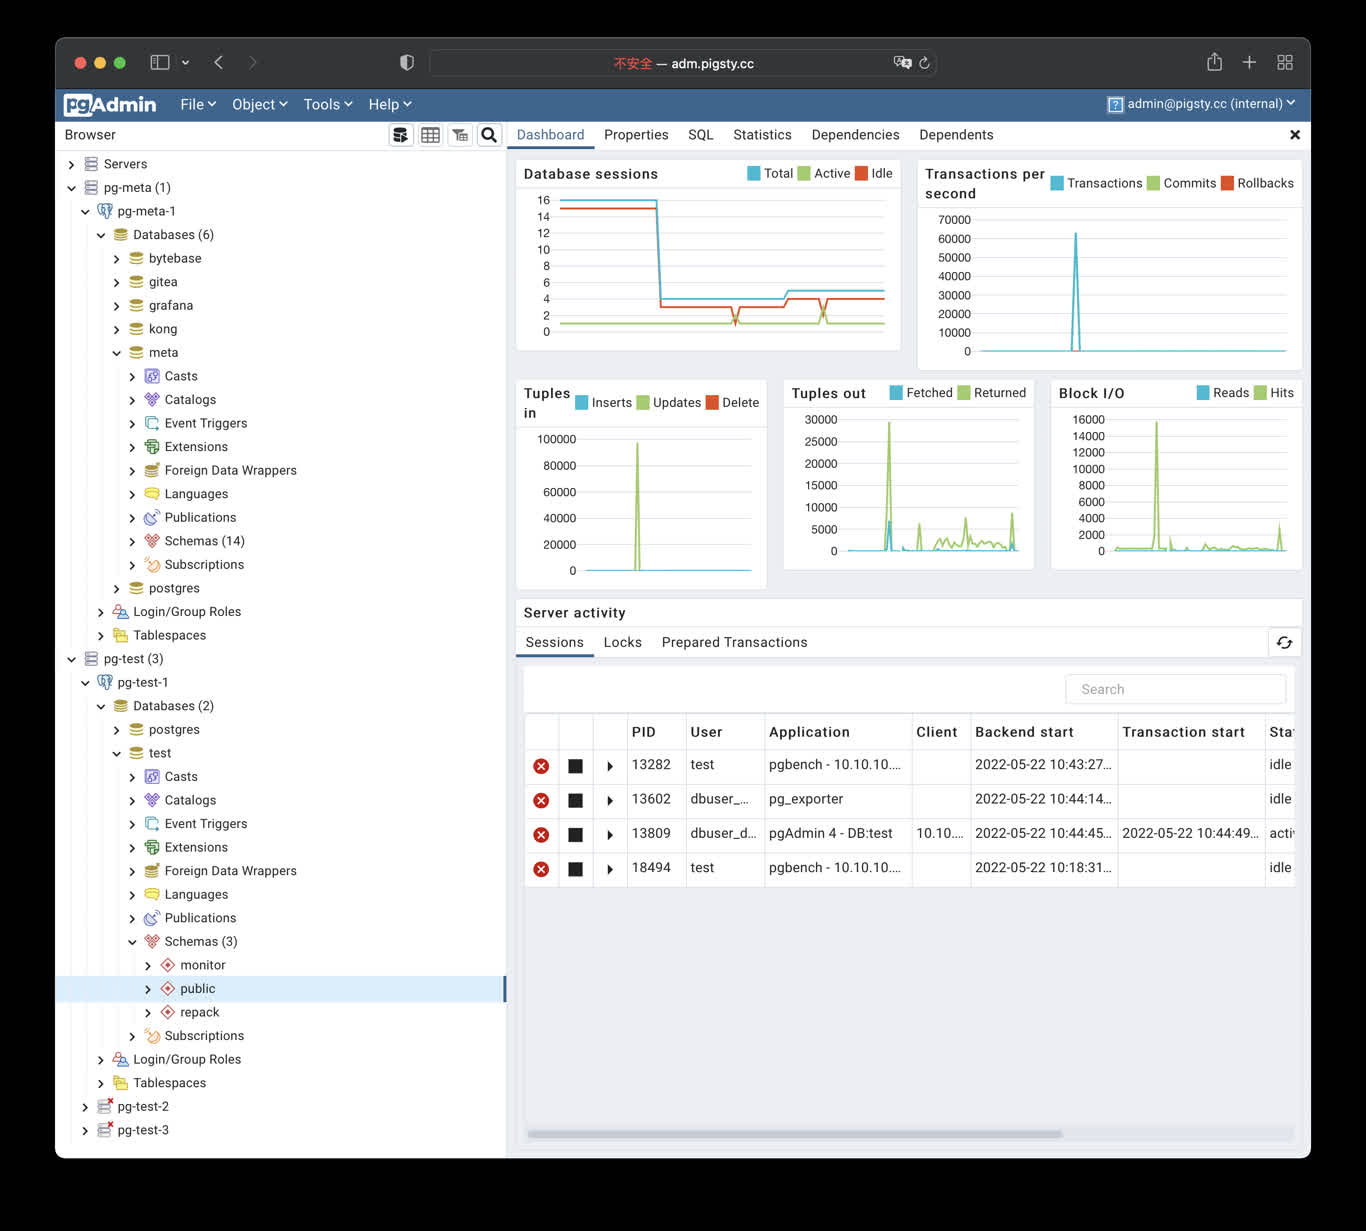
7 - PGAdmin4: PG Admin GUI Tool
Launch pgAdmin4 with docker, and load Pigsty server list into it
pgAdmin4 is a useful PostgreSQL management tool. Execute the following command to launch the pgadmin service on the admin node:
cd ~/pigsty/app/pgadmin ; docker-compose up -d
The default port for pgadmin is 8885, and you can access it through the following address:
http://adm.pigsty
Demo
Public Demo: http://adm.pigsty.io
Credentials: [email protected] / pigsty
TL; DR
cd ~/pigsty/app/pgadmin   # enter docker compose dir
make up                   # launch pgadmin container
make conf view            # load pigsty server list
Shortcuts:
make up         # pull up pgadmin with docker-compose
make run        # launch pgadmin with docker
make view       # print pgadmin access point
make log        # tail -f pgadmin logs
make info       # introspect pgadmin with jq
make stop       # stop pgadmin container
make clean      # remove pgadmin container
make conf       # provision pgadmin with pigsty pg servers list
make dump       # dump servers.json from pgadmin container
make pull       # pull latest pgadmin image
make rmi        # remove pgadmin image
make save       # save pgadmin image to /tmp/pgadmin.tgz
make load       # load pgadmin image from /tmp
8 - PostgREST: Generate REST API from Schema
Launch postgREST to generate REST API from PostgreSQL schema automatically
PostgREST is a binary component that automatically generates a REST API
based on the PostgreSQL database schema.
For example, the following command will launch postgrest with docker (local port 8884, using default admin user, and
expose Pigsty CMDB schema):
docker run --init --name postgrest --restart always --detach --publish 8884:8081 postgrest/postgrest
Visit http://10.10.10.10:8884 will show all auto-generated API definitions and automatically
expose API documentation using Swagger Editor.
If you wish to perform CRUD operations and design more fine-grained permission control, please refer
to Tutorial 1 - The Golden Key to generate a signed JWT.
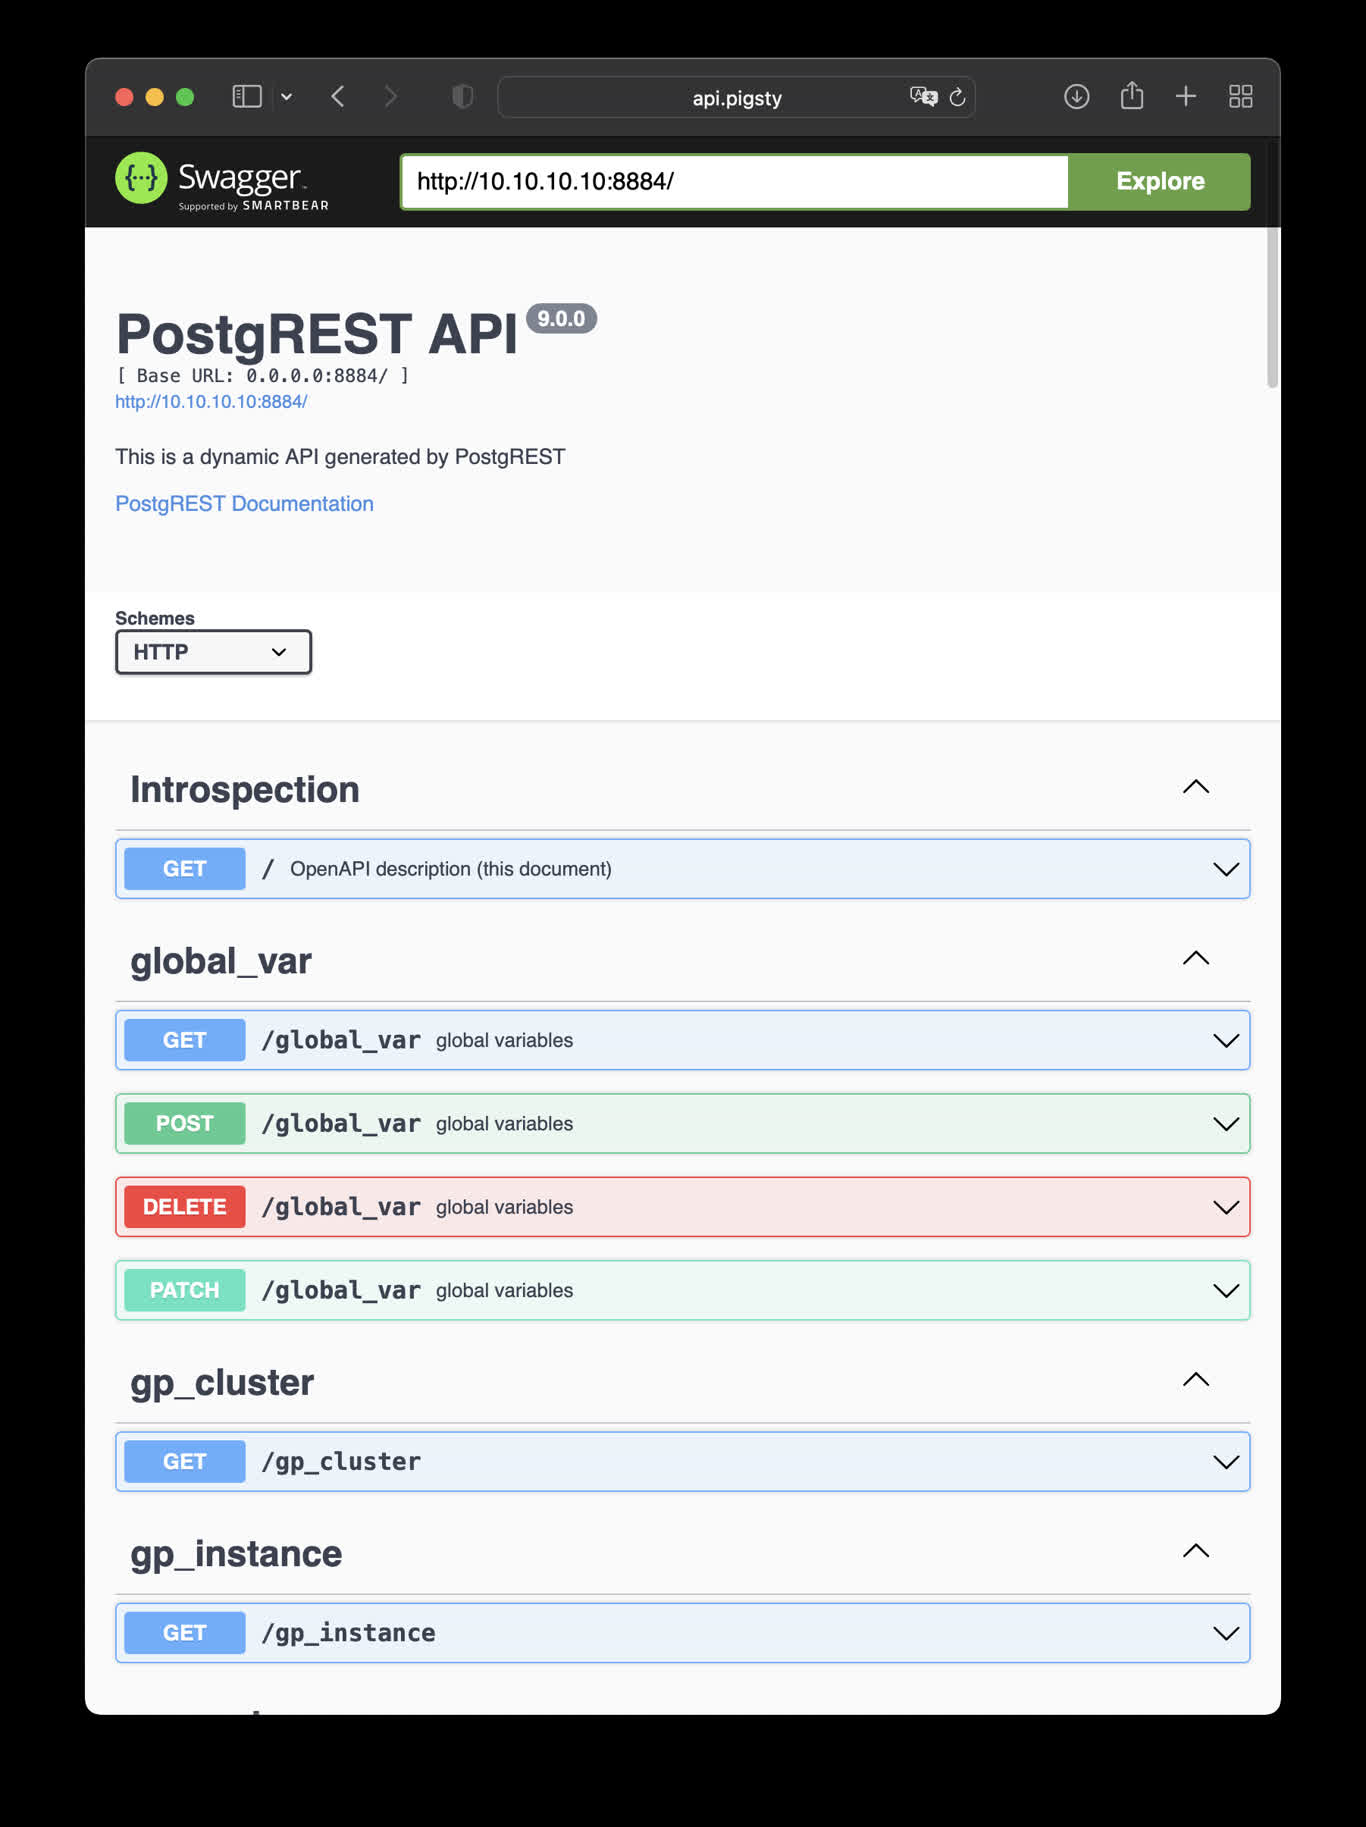
This is an example of creating pigsty cmdb API with PostgREST
cd ~/pigsty/app/postgrest ; docker-compose up -d
http://10.10.10.10:8884 is the default endpoint for PostgREST
http://10.10.10.10:8883 is the default api docs for PostgREST
make up         # pull up postgrest with docker-compose
make run        # launch postgrest with docker
make ui         # run swagger ui container
make view       # print postgrest access point
make log        # tail -f postgrest logs
make info       # introspect postgrest with jq
make stop       # stop postgrest container
make clean      # remove postgrest container
make rmui       # remove swagger ui container
make pull       # pull latest postgrest image
make rmi        # remove postgrest image
make save       # save postgrest image to /tmp/postgrest.tgz
make load       # load postgrest image from /tmp
Swagger UI
Launch a swagger OpenAPI UI and visualize PostgREST API on 8883 with:
docker run --init --name postgrest --name swagger -p 8883:8080 -e API_URL=http://10.10.10.10:8884 swaggerapi/swagger-ui
# docker run -d -e API_URL=http://10.10.10.10:8884 -p 8883:8080 swaggerapi/swagger-editor # swagger editor
Check http://10.10.10.10:8883/
9 - SchemaSPY: Dump & Visualize PG Schema
Dump & visualize PostgreSQL schema with SchemaSPY
Use the following docker command to generate a database schema report, using CMDB as an example:
docker run -v /www/schema/pg-meta/meta/pigsty:/output andrewjones/schemaspy-postgres:latest -host 10.10.10.10 -port 5432 -u dbuser_dba -p DBUser.DBA -db meta -s pigsty
Then visit http://h.pigsty/schema/pg-meta/meta/pigsty to access the schema report.
10 - PGWeb: Browser-based PG Client
Launch pgweb to access PostgreSQL via web browser
PGWEB: https://github.com/sosedoff/pgweb
Simple web-based and cross-platform PostgreSQL database explorer.
Public Demo: http://cli.pigsty.io

TL; DR
cd ~/pigsty/app/pgweb ; make up
Visit http://cli.pigsty or http://10.10.10.10:8886
Try connecting with example URLs:
make up         # pull up pgweb with docker compose
make run        # launch pgweb with docker
make view       # print pgweb access point
make log        # tail -f pgweb logs
make info       # introspect pgweb with jq
make stop       # stop pgweb container
make clean      # remove pgweb container
make pull       # pull latest pgweb image
make rmi        # remove pgweb image
make save       # save pgweb image to /tmp/docker/pgweb.tgz
make load       # load pgweb image from /tmp/docker/pgweb.tgz
快捷方式
make up         # pull up pgweb with docker-compose
make run        # launch pgweb with docker
make view       # print pgweb access point
make log        # tail -f pgweb logs
make info       # introspect pgweb with jq
make stop       # stop pgweb container
make clean      # remove pgweb container
make pull       # pull latest pgweb image
make rmi        # remove pgweb image
make save       # save pgweb image to /tmp/pgweb.tgz
make load       # load pgweb image from /tmp
11 - Discourse: OSS Forum Software
How to self-hosting open source forum software – Discourse, and use external PG managed by Pigsty
To setup an open-source forum Discourse, you need to adjust the default app.yml config, focusing on the SMTP part of the configuration.
Discourse Config Example
templates:
  - "templates/web.china.template.yml"
  - "templates/postgres.template.yml"
  - "templates/redis.template.yml"
  - "templates/web.template.yml"
  - "templates/web.ratelimited.template.yml"
## Uncomment these two lines if you wish to add Lets Encrypt (https)
# - "templates/web.ssl.template.yml"
# - "templates/web.letsencrypt.ssl.template.yml"
expose:
  - "80:80"   # http
  - "443:443" # https
params:
  db_default_text_search_config: "pg_catalog.english"
  db_shared_buffers: "768MB"
env:
  LC_ALL: en_US.UTF-8
  LANG: en_US.UTF-8
  LANGUAGE: en_US.UTF-8
  EMBER_CLI_PROD_ASSETS: 1
  UNICORN_WORKERS: 4
  DISCOURSE_HOSTNAME: forum.pigsty
  DISCOURSE_DEVELOPER_EMAILS: '[email protected],[email protected]'
  DISCOURSE_SMTP_ENABLE_START_TLS: false
  DISCOURSE_SMTP_AUTHENTICATION: login
  DISCOURSE_SMTP_OPENSSL_VERIFY_MODE: none
  DISCOURSE_SMTP_ADDRESS: smtpdm.server.address
  DISCOURSE_SMTP_PORT: 80
  DISCOURSE_SMTP_USER_NAME: [email protected]
  DISCOURSE_SMTP_PASSWORD: "<password>"
  DISCOURSE_SMTP_DOMAIN: mail.pigsty.io
volumes:
  - volume:
      host: /var/discourse/shared/standalone
      guest: /shared
  - volume:
      host: /var/discourse/shared/standalone/log/var-log
      guest: /var/log

hooks:
  after_code:
    - exec:
        cd: $home/plugins
        cmd:
          - git clone https://github.com/discourse/docker_manager.git
run:
  - exec: echo "Beginning of custom commands"
  # - exec: rails r "SiteSetting.notification_email='[email protected]'"
  - exec: echo "End of custom commands"
Then launch Discourse with the following command:
12 - GitLab: OSS GitHub Alternative
How to self-hosting GitLab, and use external HA PostgreSQL cluster?
Check Gitlab Docker Deployment to finish docker deployment.
export GITLAB_HOME=/data/gitlab

sudo docker run --detach \
  --hostname gitlab.example.com \
  --publish 443:443 --publish 80:80 --publish 23:22 \
  --name gitlab \
  --restart always \
  --volume $GITLAB_HOME/config:/etc/gitlab \
  --volume $GITLAB_HOME/logs:/var/log/gitlab \
  --volume $GITLAB_HOME/data:/var/opt/gitlab \
  --shm-size 256m \
  gitlab/gitlab-ee:latest

sudo docker exec -it gitlab grep 'Password:' /etc/gitlab/initial_root_password
Then change the connection string to the Pigsty managed PostgreSQL clusters.